> ## Documentation Index
> Fetch the complete documentation index at: https://docs.glood.ai/llms.txt
> Use this file to discover all available pages before exploring further.
# Get Started
> Get started with Glood AI Image & Video Editor
## Getting Started with AI Image & Video Editor
Welcome to Glood AI Image & Video Editor! This guide will walk you through the three main features: AI Video Generation, Image Editing, and Workflow Automation. Plus, learn about our credit-based pricing system.
**Free Credits on Install**: Get \$20 in free credits when you install the app to start creating immediately!
## Prerequisites
Before you begin, ensure you have:
* Installed the Glood AI Image & Video Editor app from the Shopify App Store
* Products with images in your Shopify store
* An active Shopify Plus store
## Feature Walkthroughs
### Generate AI Videos from Product Images
Transform your static product photos into engaging video content in minutes.
From the main dashboard, click on **"Generate Video"** button or navigate to the Videos section from the sidebar.
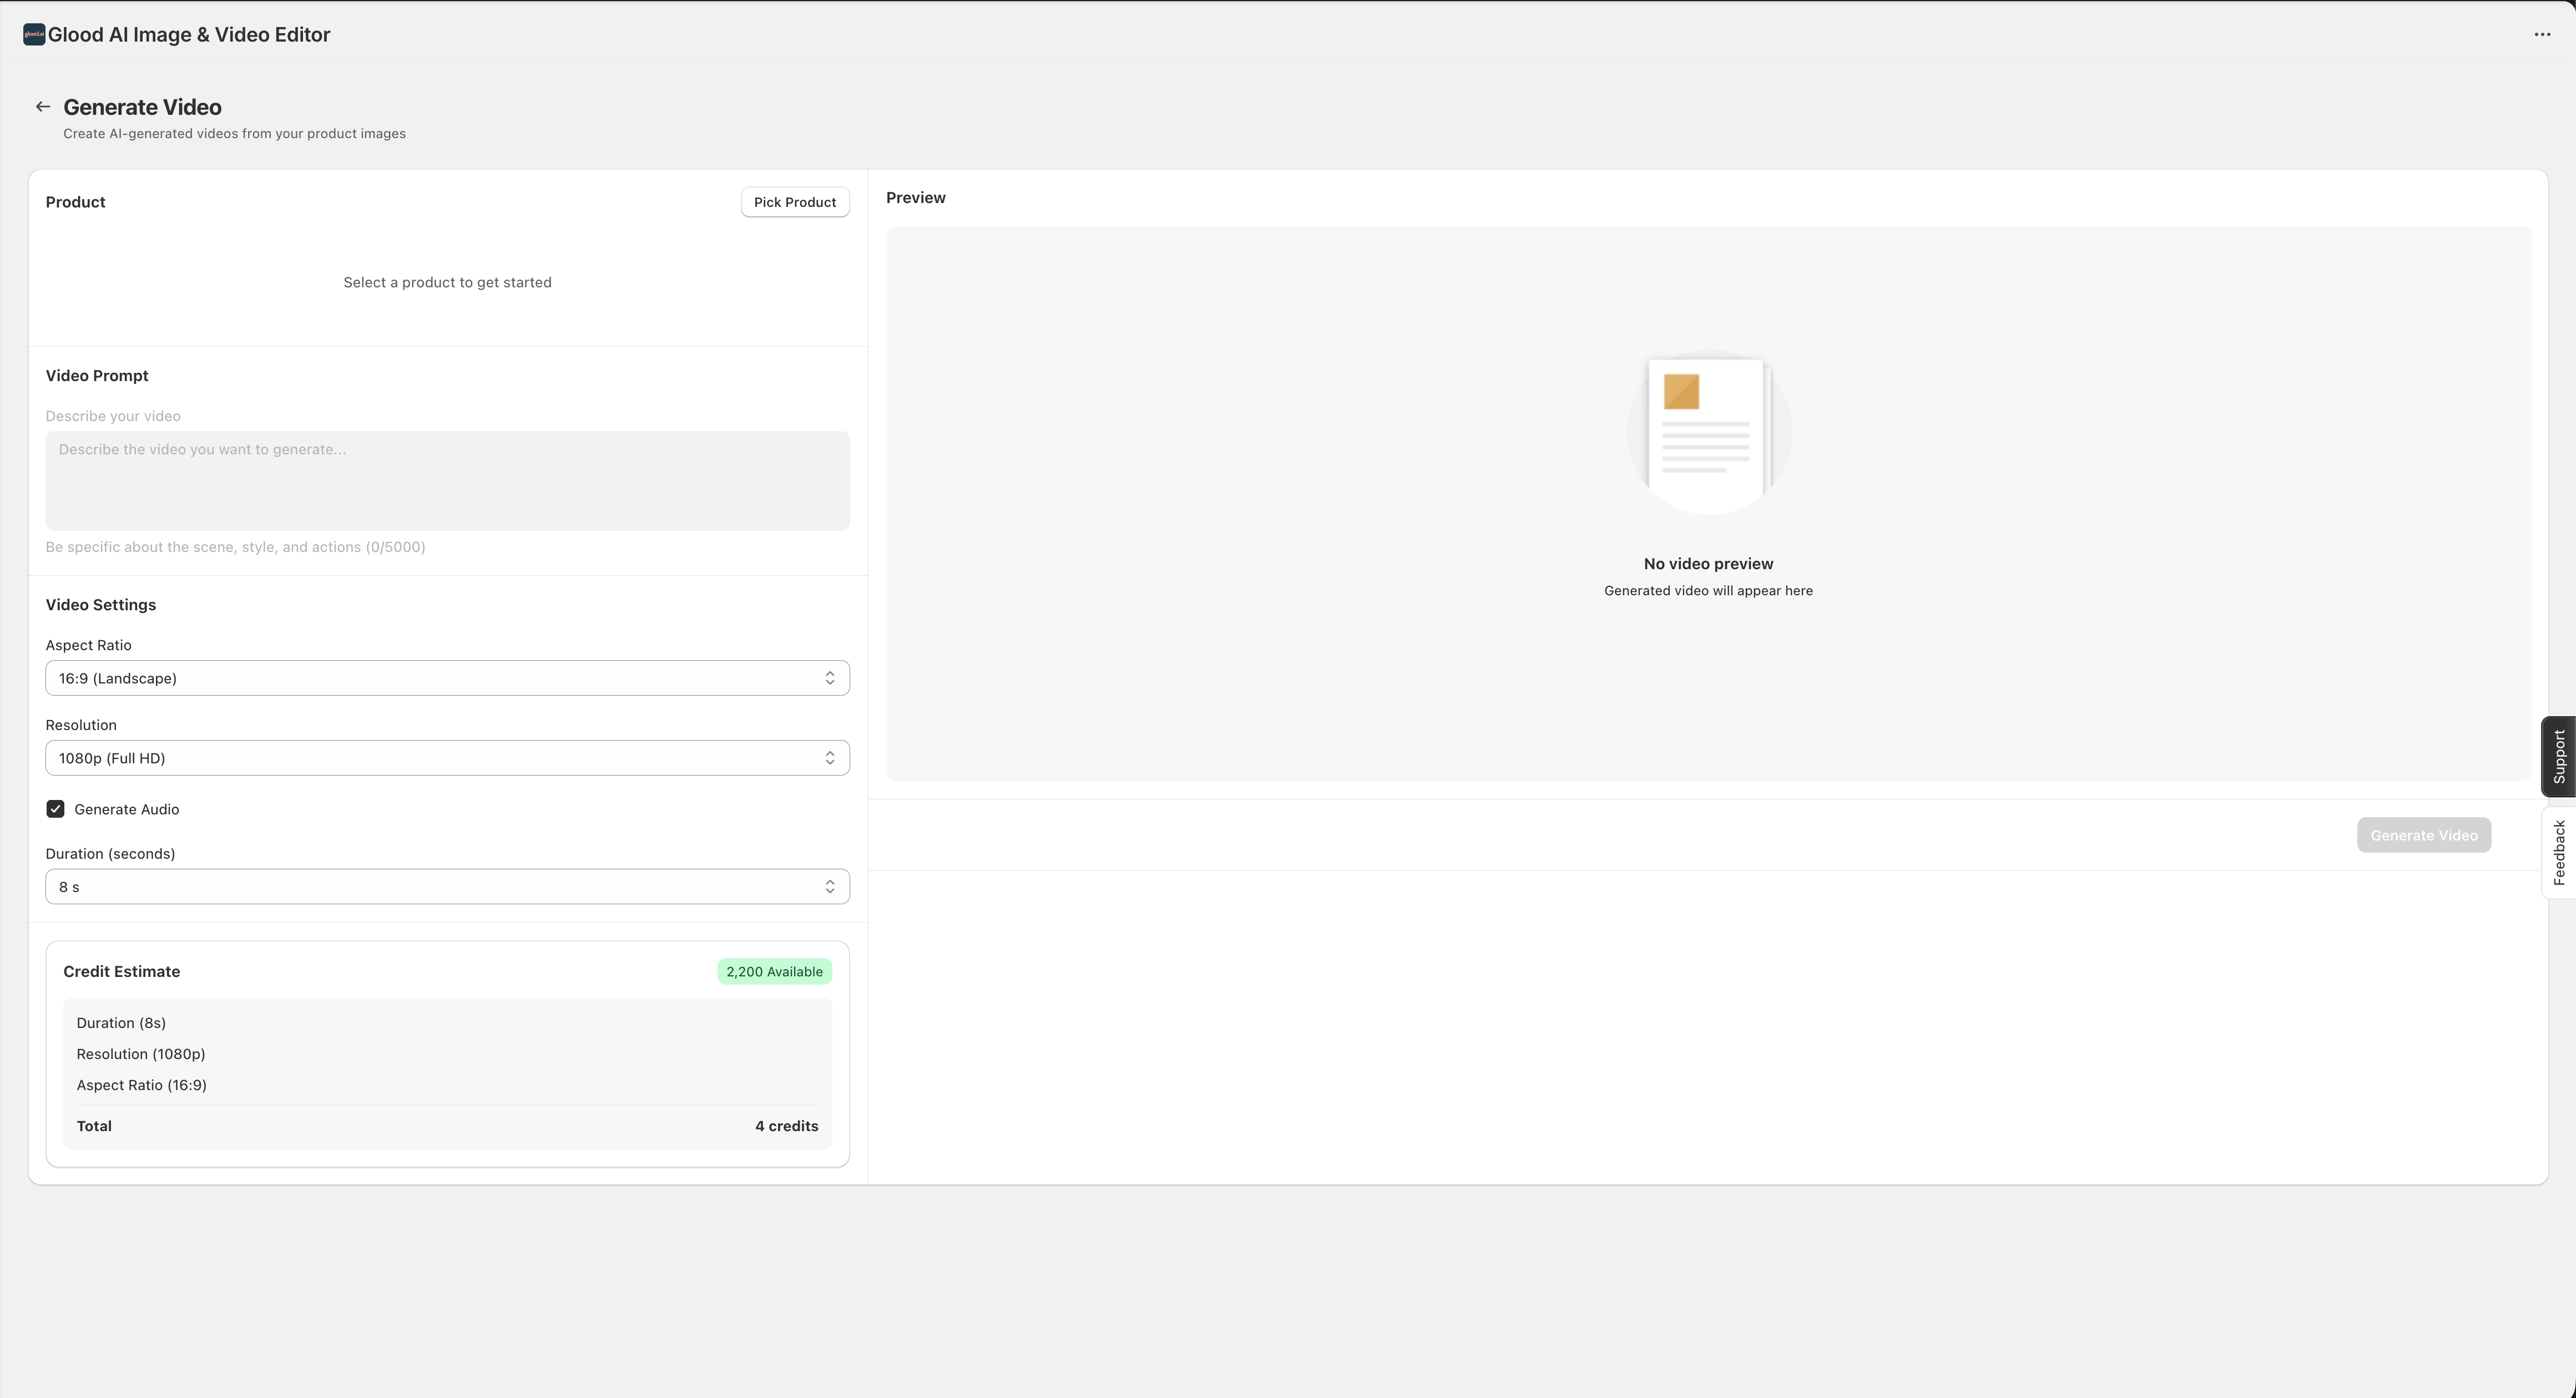 Click **"Pick Product"** to open the product selector. You can:
* Search for products by name
* Filter by collection or availability
* Select single or multiple product variants
* Add custom filters to narrow down your selection
Click **"Pick Product"** to open the product selector. You can:
* Search for products by name
* Filter by collection or availability
* Select single or multiple product variants
* Add custom filters to narrow down your selection
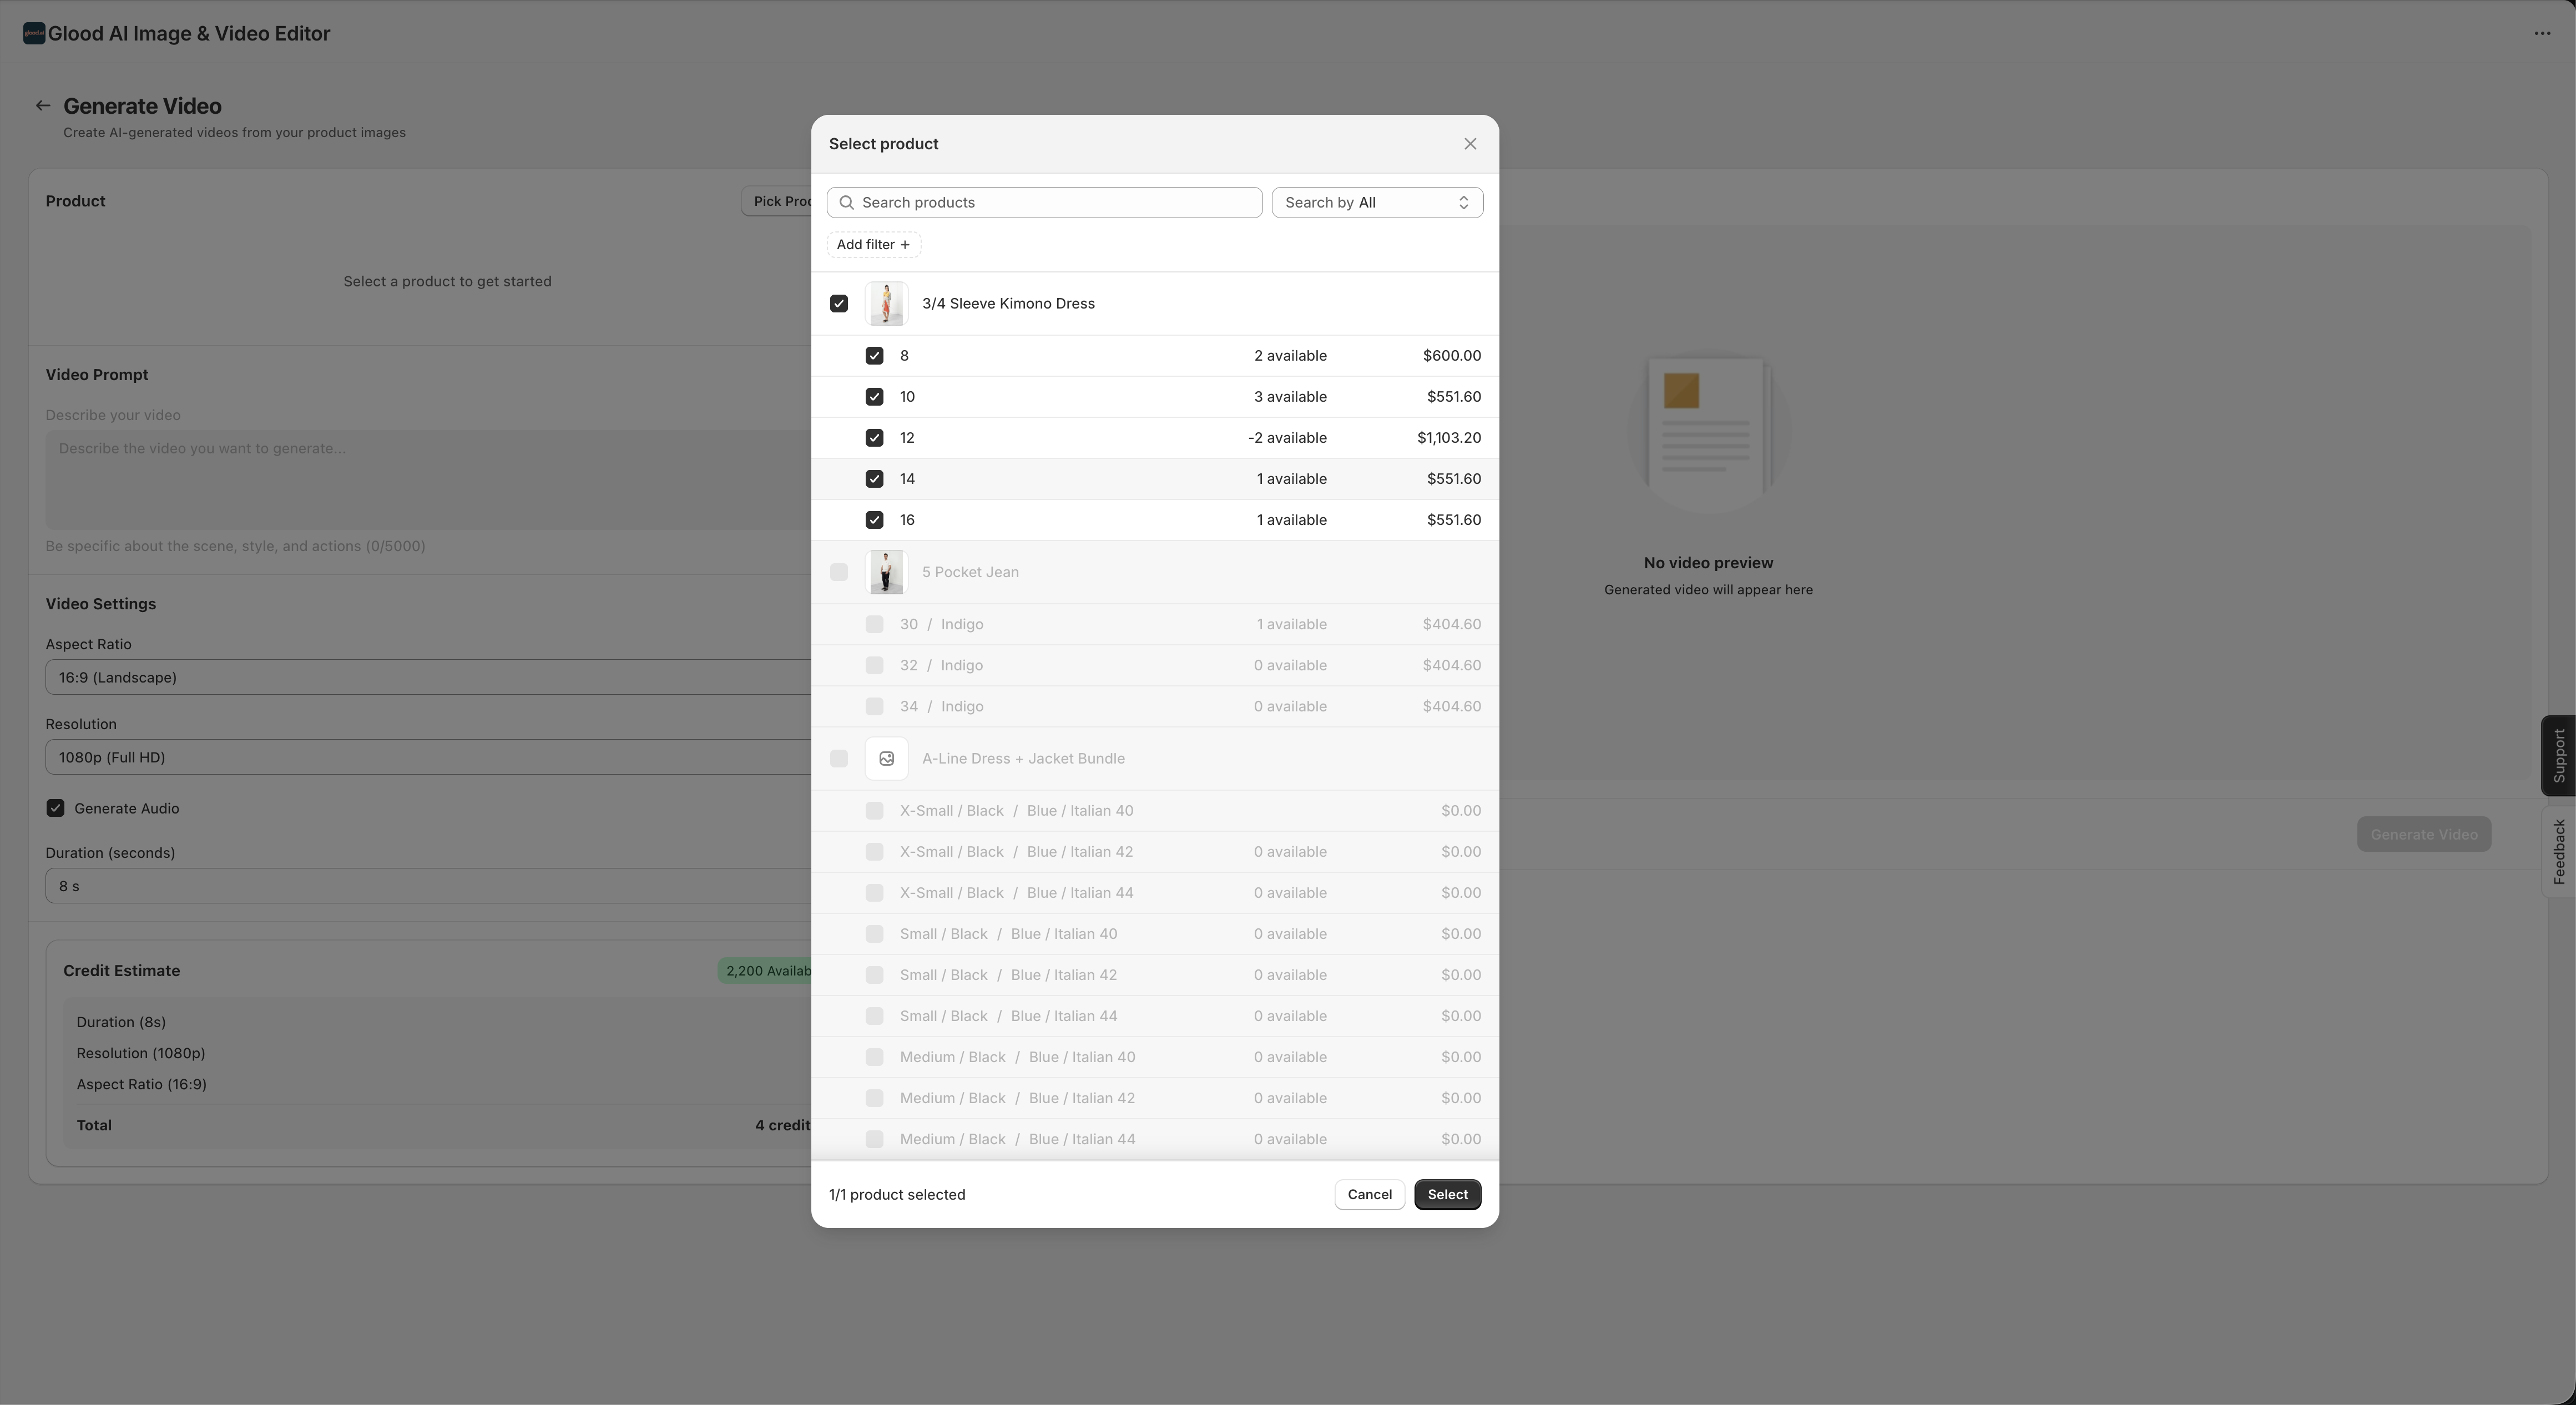 Select the products you want to create videos for and click **"Select"**.
Once your product is selected, configure your video parameters:
Select the products you want to create videos for and click **"Select"**.
Once your product is selected, configure your video parameters:
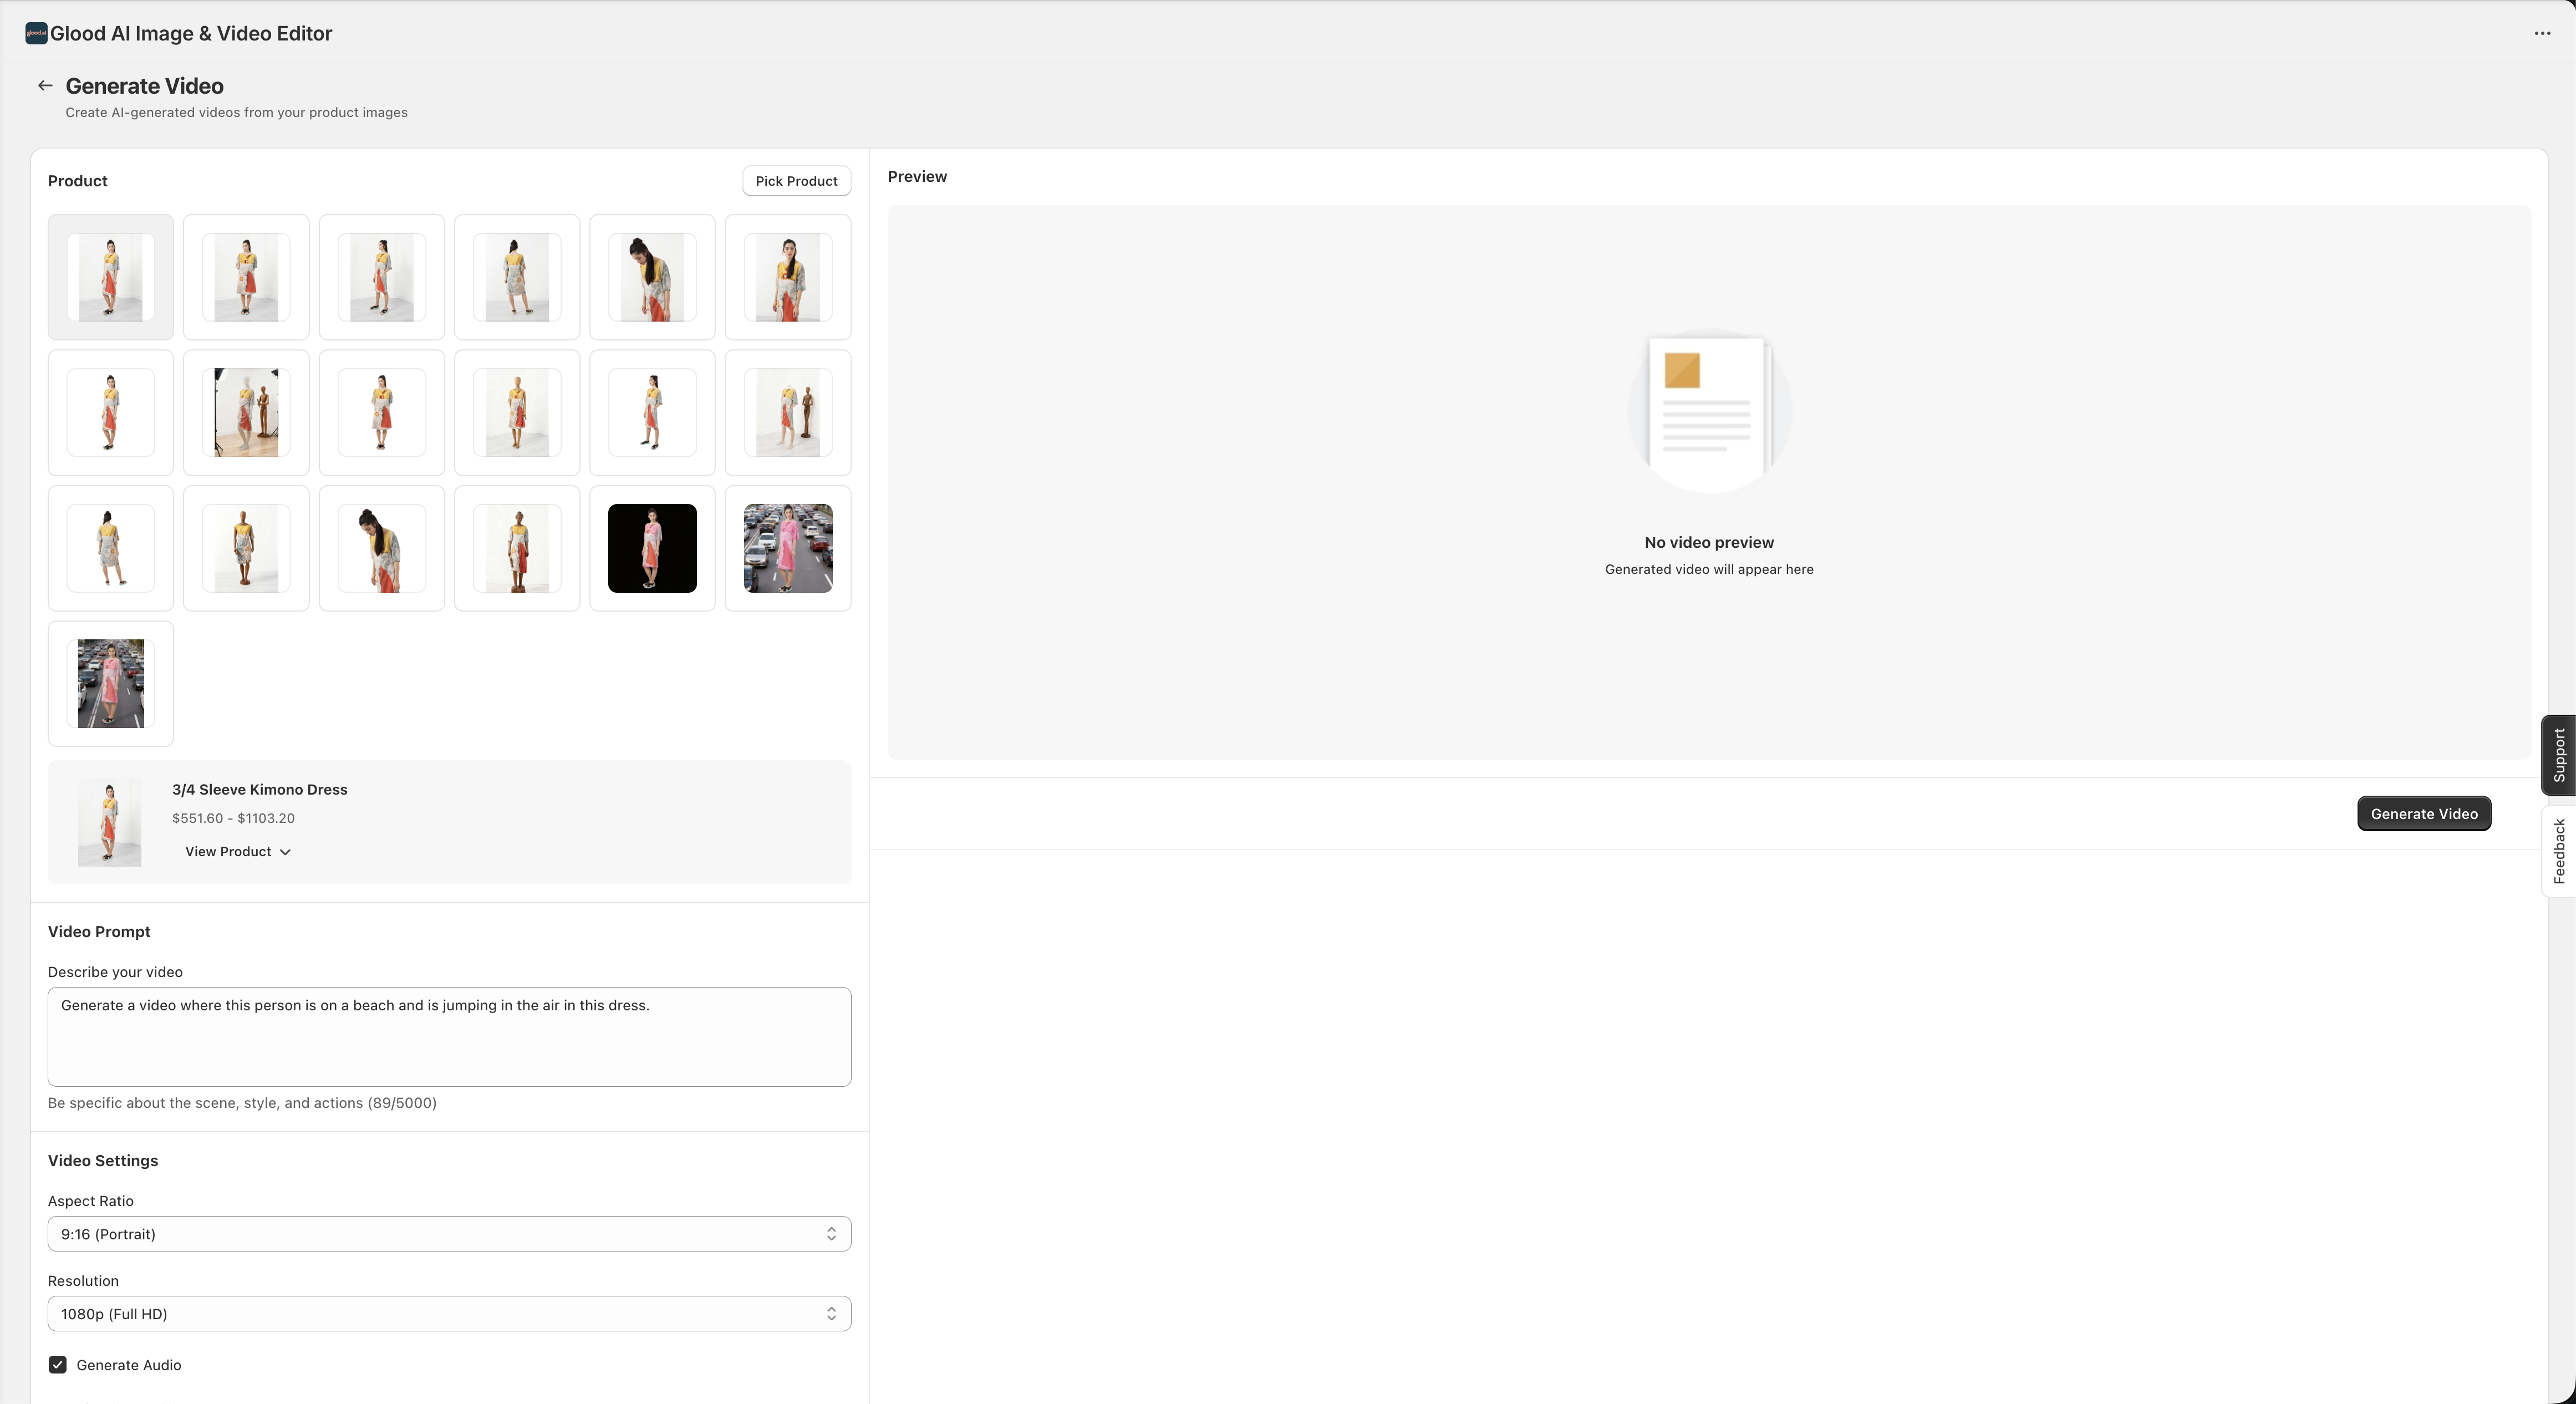 **Video Prompt**: Describe the video you want to generate. Be specific about the scene, style, and actions. Example: *"Create a realistic video of this person moving to show the dress"*
**Video Settings**:
* **Aspect Ratio**: Choose from 16:9 (Landscape), 9:16 (Portrait), 1:1 (Square)
* **Resolution**: Select from 1080p (Full HD), 720p (HD), or 480p (SD)
* **Generate Audio**: Toggle to add AI-generated audio to your video
* **Duration**: Set video length in seconds (typically 5-15 seconds)
**Credit Estimate**: View the estimated credit cost based on your settings before generation.
Click **"Generate Video"** to start the AI generation process.
**Video Prompt**: Describe the video you want to generate. Be specific about the scene, style, and actions. Example: *"Create a realistic video of this person moving to show the dress"*
**Video Settings**:
* **Aspect Ratio**: Choose from 16:9 (Landscape), 9:16 (Portrait), 1:1 (Square)
* **Resolution**: Select from 1080p (Full HD), 720p (HD), or 480p (SD)
* **Generate Audio**: Toggle to add AI-generated audio to your video
* **Duration**: Set video length in seconds (typically 5-15 seconds)
**Credit Estimate**: View the estimated credit cost based on your settings before generation.
Click **"Generate Video"** to start the AI generation process.
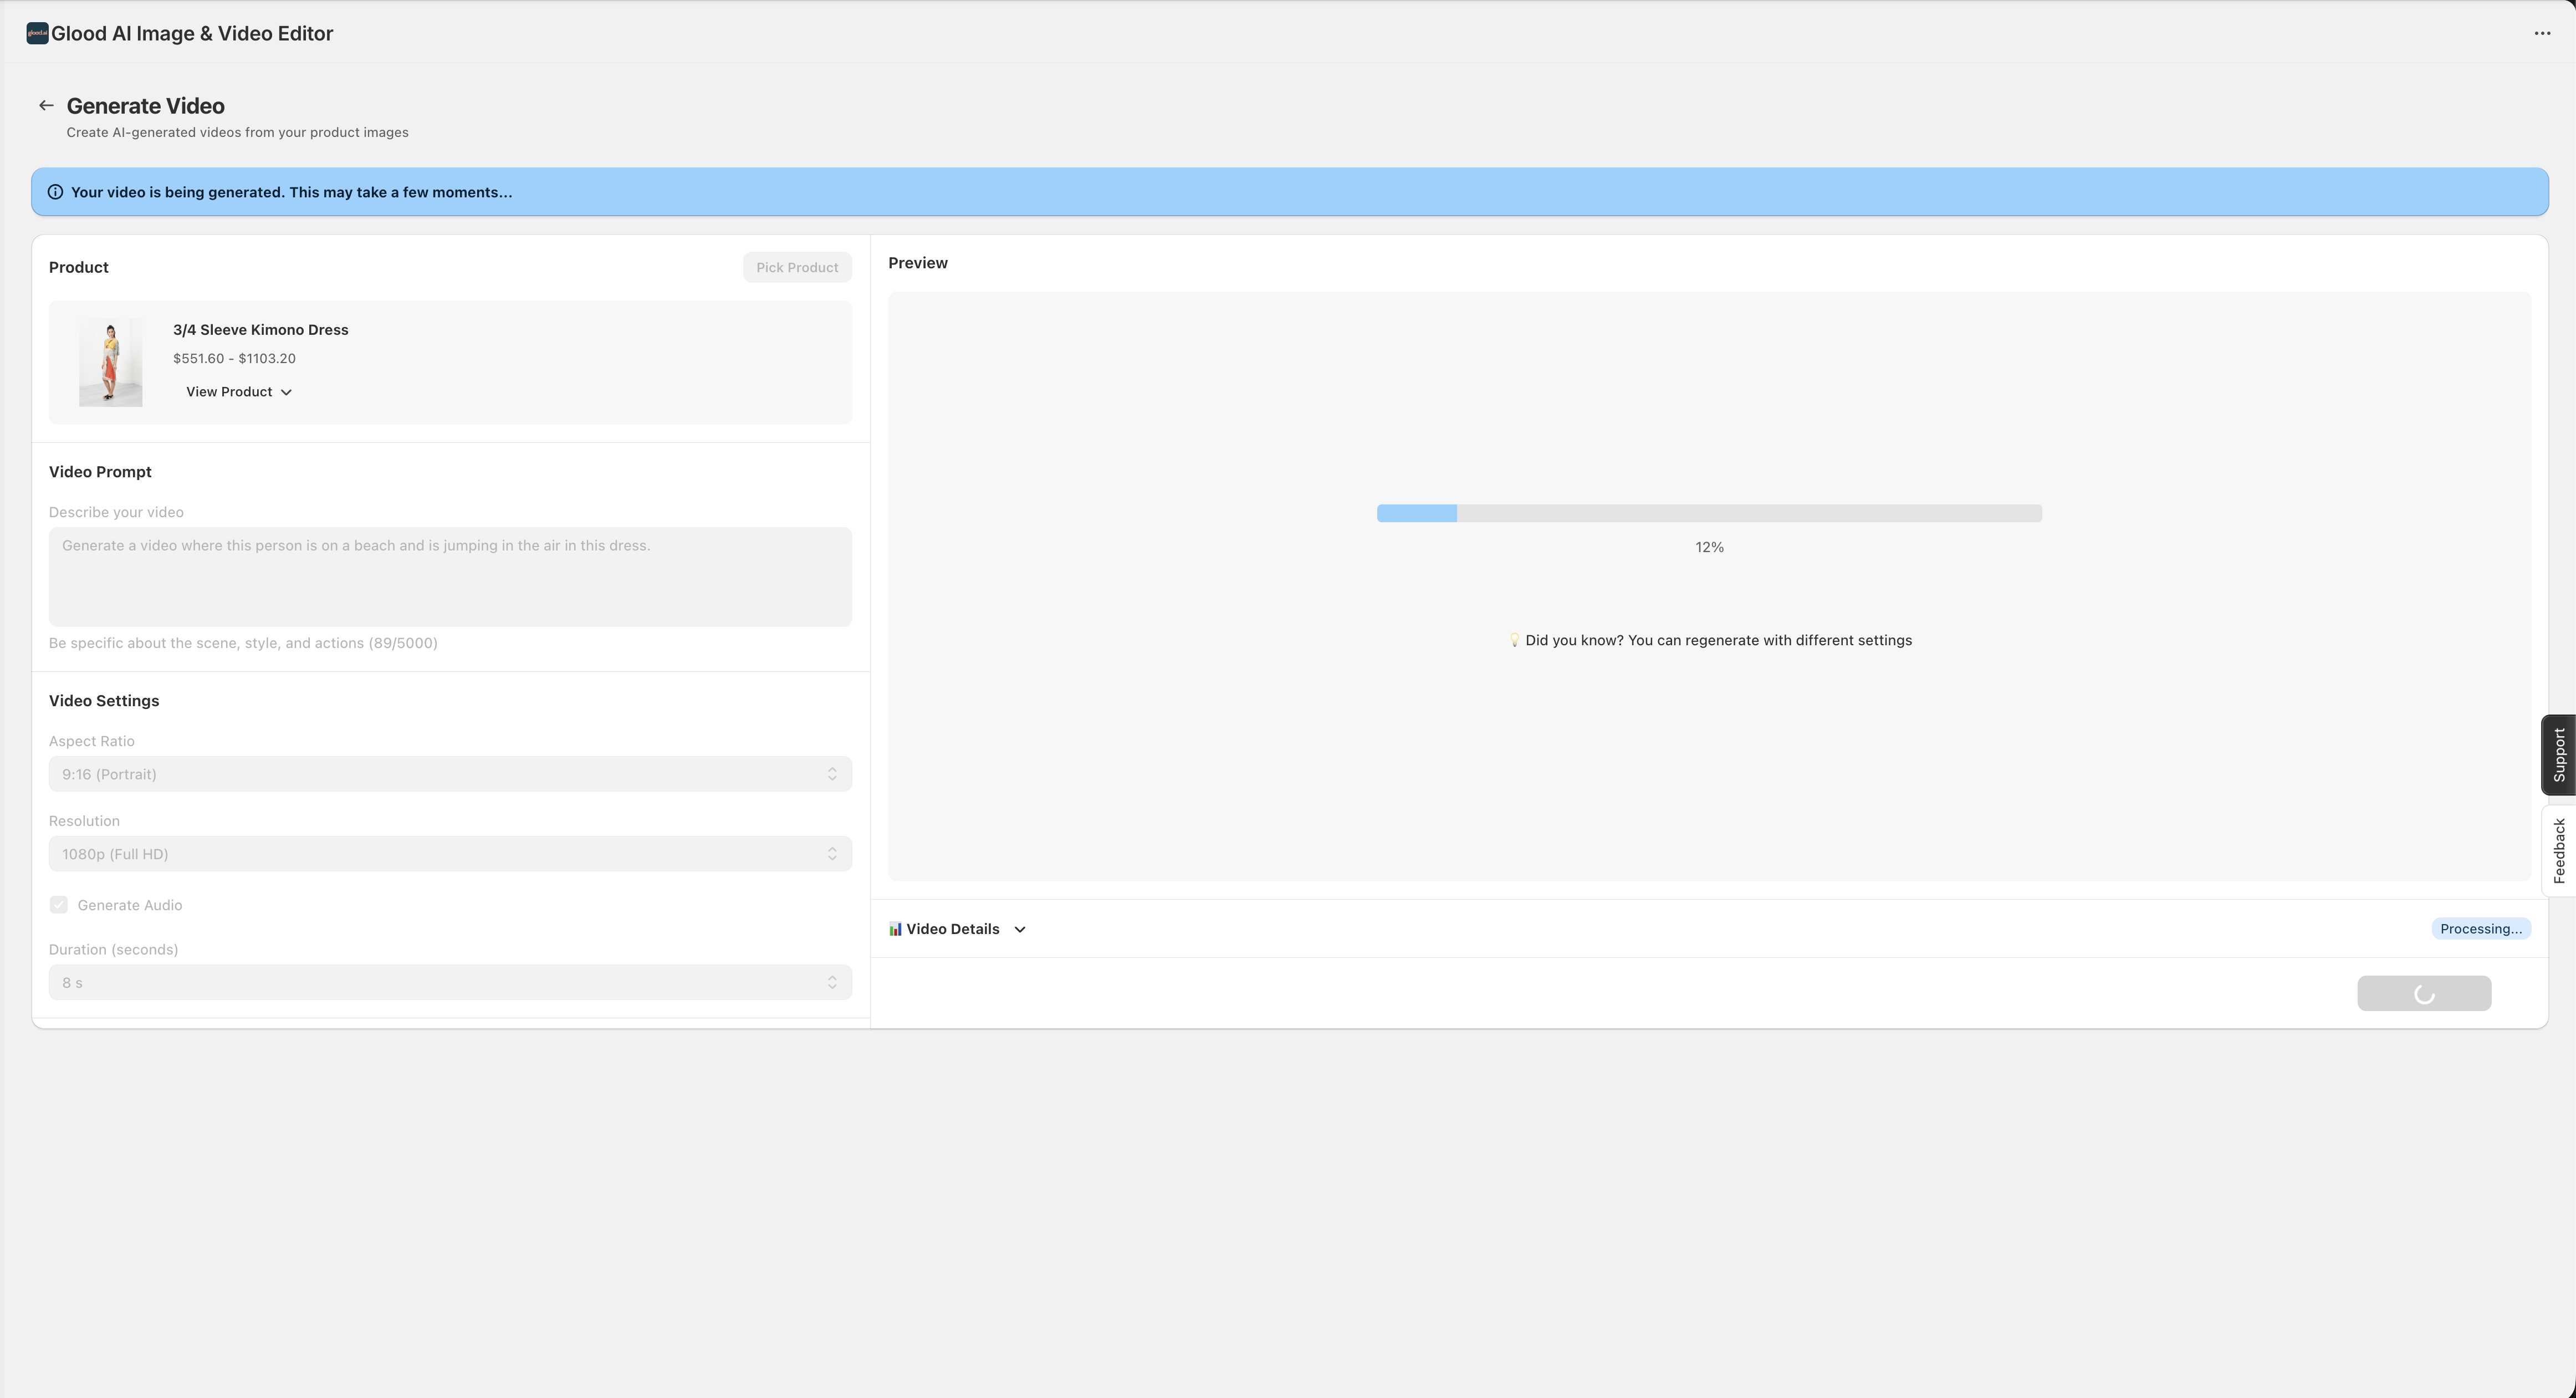 The system will:
1. Process your product images
2. Apply AI models to generate motion and effects
3. Render the final video
You'll see a progress indicator showing completion percentage. This typically takes 2-5 minutes depending on video length and quality settings.
Once completed, preview your generated video:
The system will:
1. Process your product images
2. Apply AI models to generate motion and effects
3. Render the final video
You'll see a progress indicator showing completion percentage. This typically takes 2-5 minutes depending on video length and quality settings.
Once completed, preview your generated video:
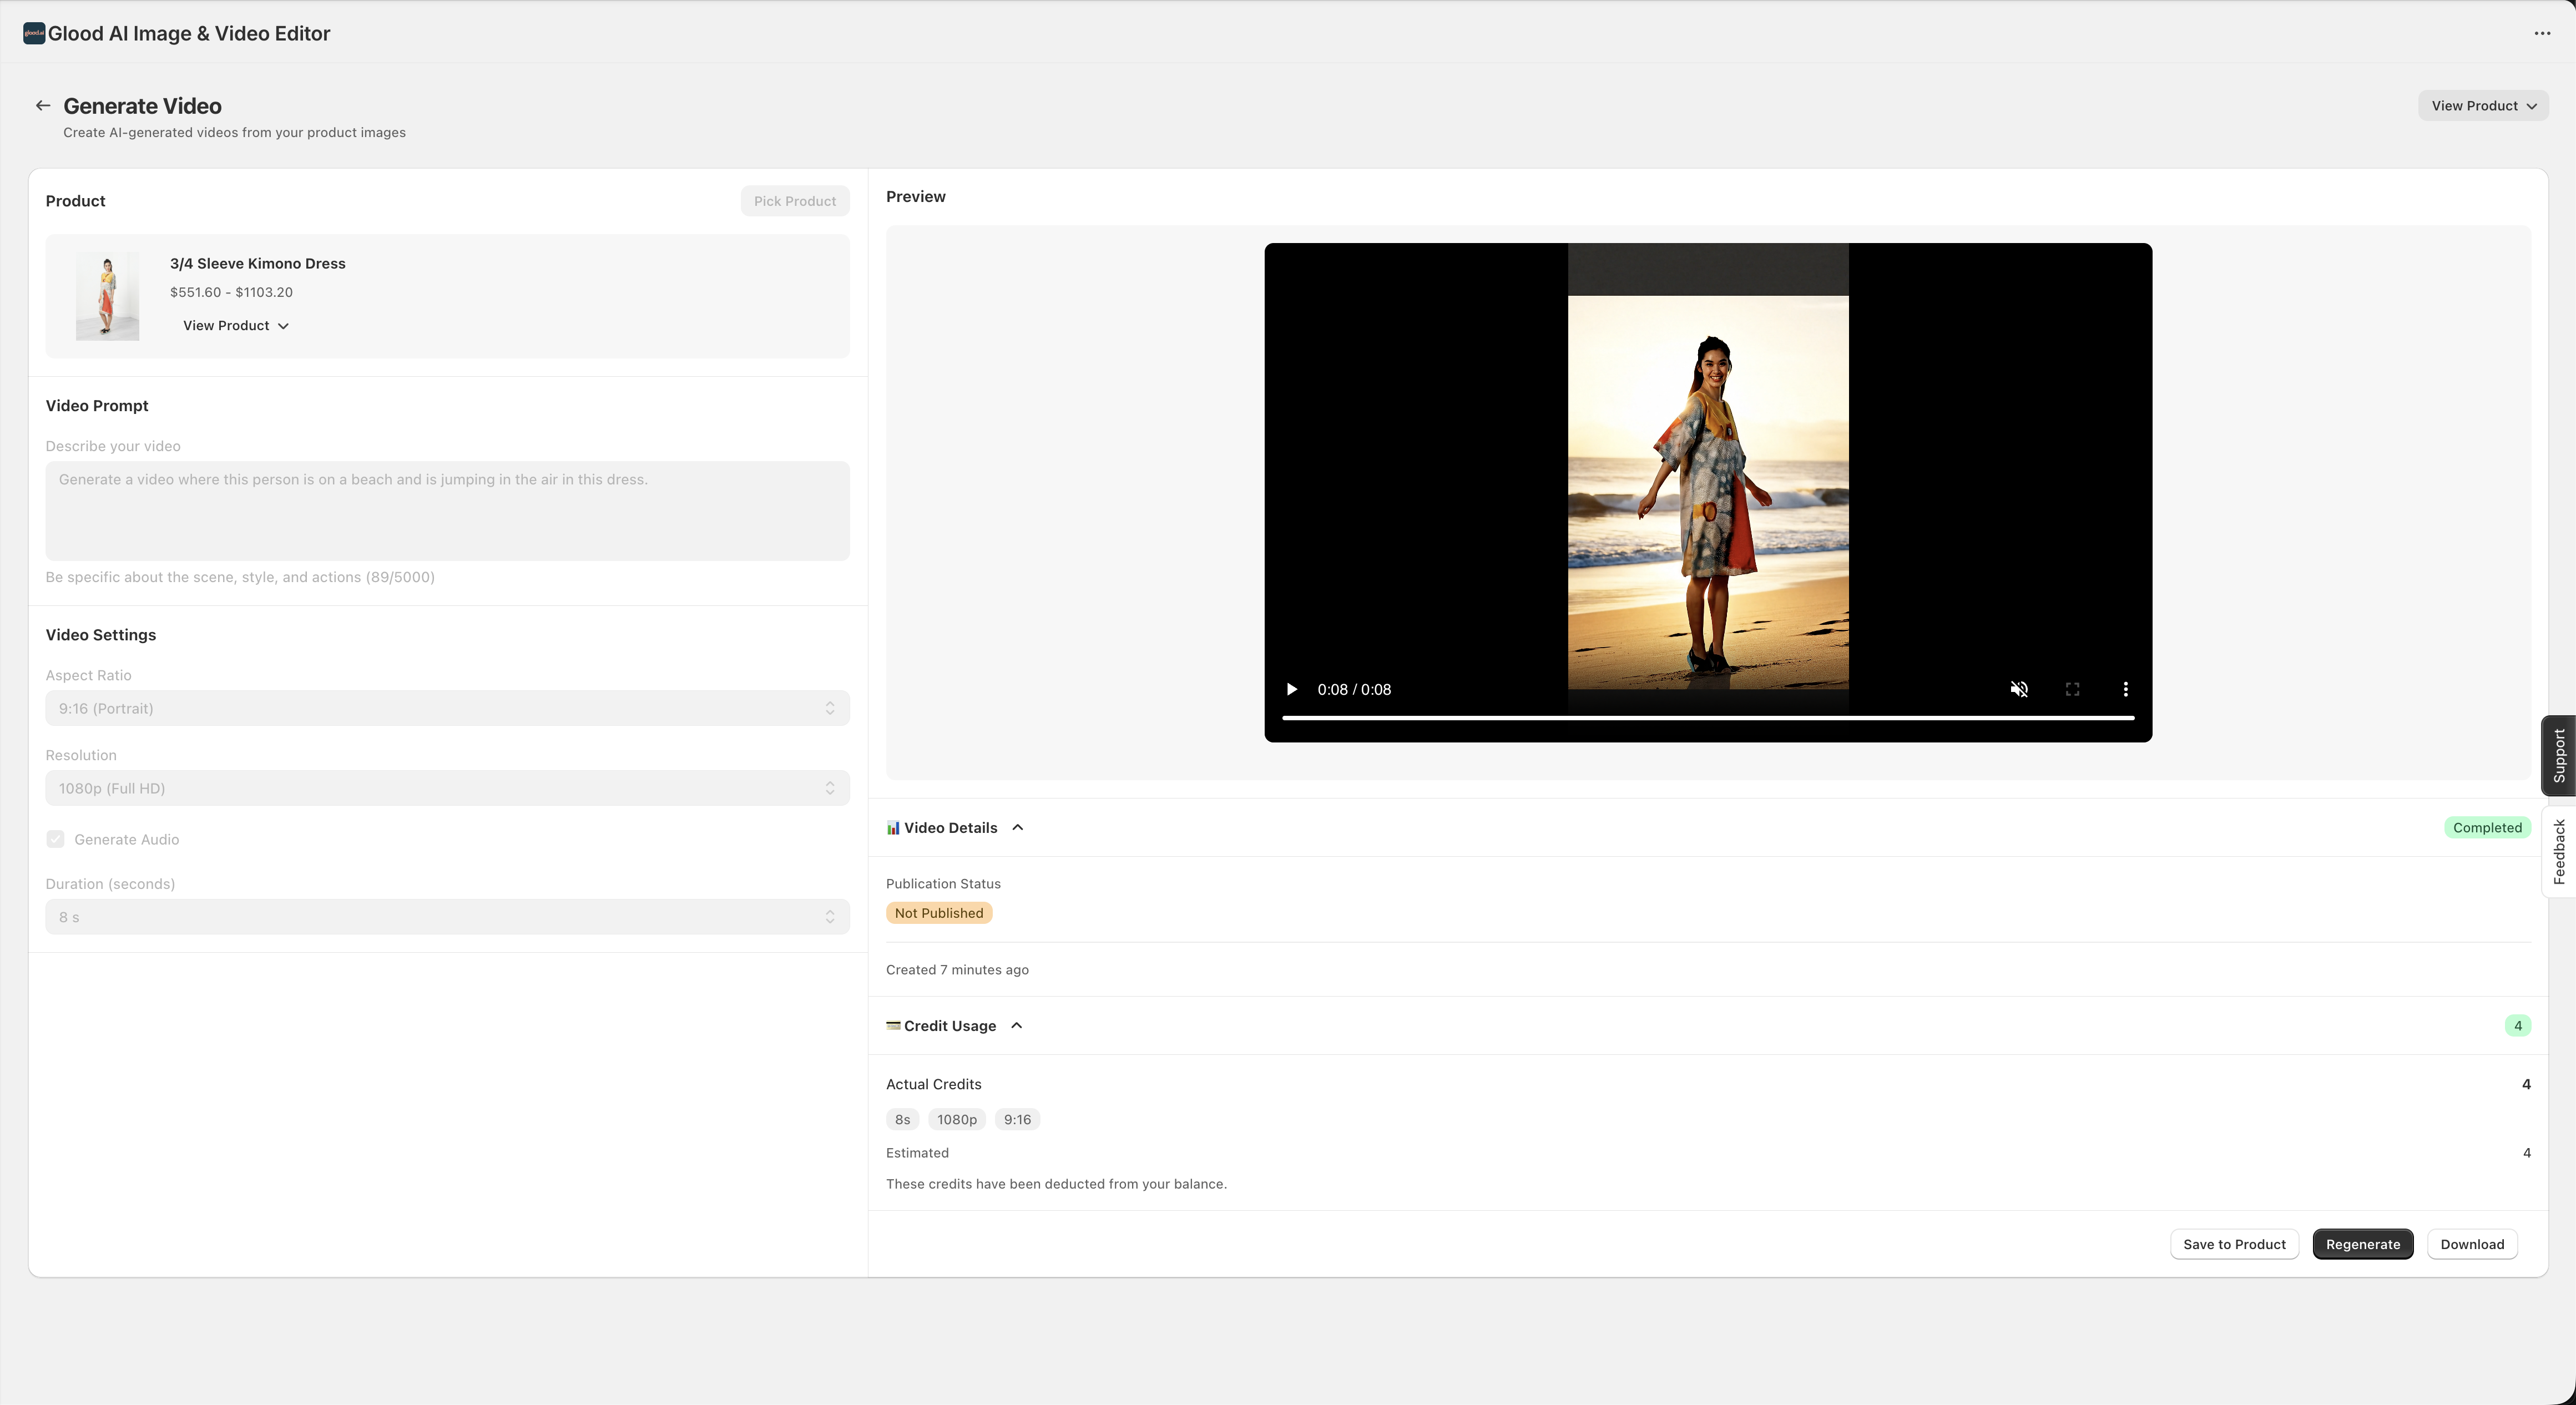 **Video Details**:
* View publication status
* Check creation timestamp
* Review credit usage
**Actions**:
* **Download**: Save the video to your device
* **Regenerate**: Create a new version with different settings
* **Remove from Product**: Unlink the video from the product
* The video is automatically **Published** to your Shopify product media
**Tip**: You can close the page during generation and check back later. Your video will continue processing in the background.
### Edit Product Images with AI
Use AI-powered tools to enhance, resize, and transform your product images.
From the dashboard, click **"Edit Image"** or navigate to the Images section.
**Video Details**:
* View publication status
* Check creation timestamp
* Review credit usage
**Actions**:
* **Download**: Save the video to your device
* **Regenerate**: Create a new version with different settings
* **Remove from Product**: Unlink the video from the product
* The video is automatically **Published** to your Shopify product media
**Tip**: You can close the page during generation and check back later. Your video will continue processing in the background.
### Edit Product Images with AI
Use AI-powered tools to enhance, resize, and transform your product images.
From the dashboard, click **"Edit Image"** or navigate to the Images section.
 You'll see your image editing activity, recently edited images, and quick access to editing tools.
Click to select the products and images you want to edit:
You'll see your image editing activity, recently edited images, and quick access to editing tools.
Click to select the products and images you want to edit:
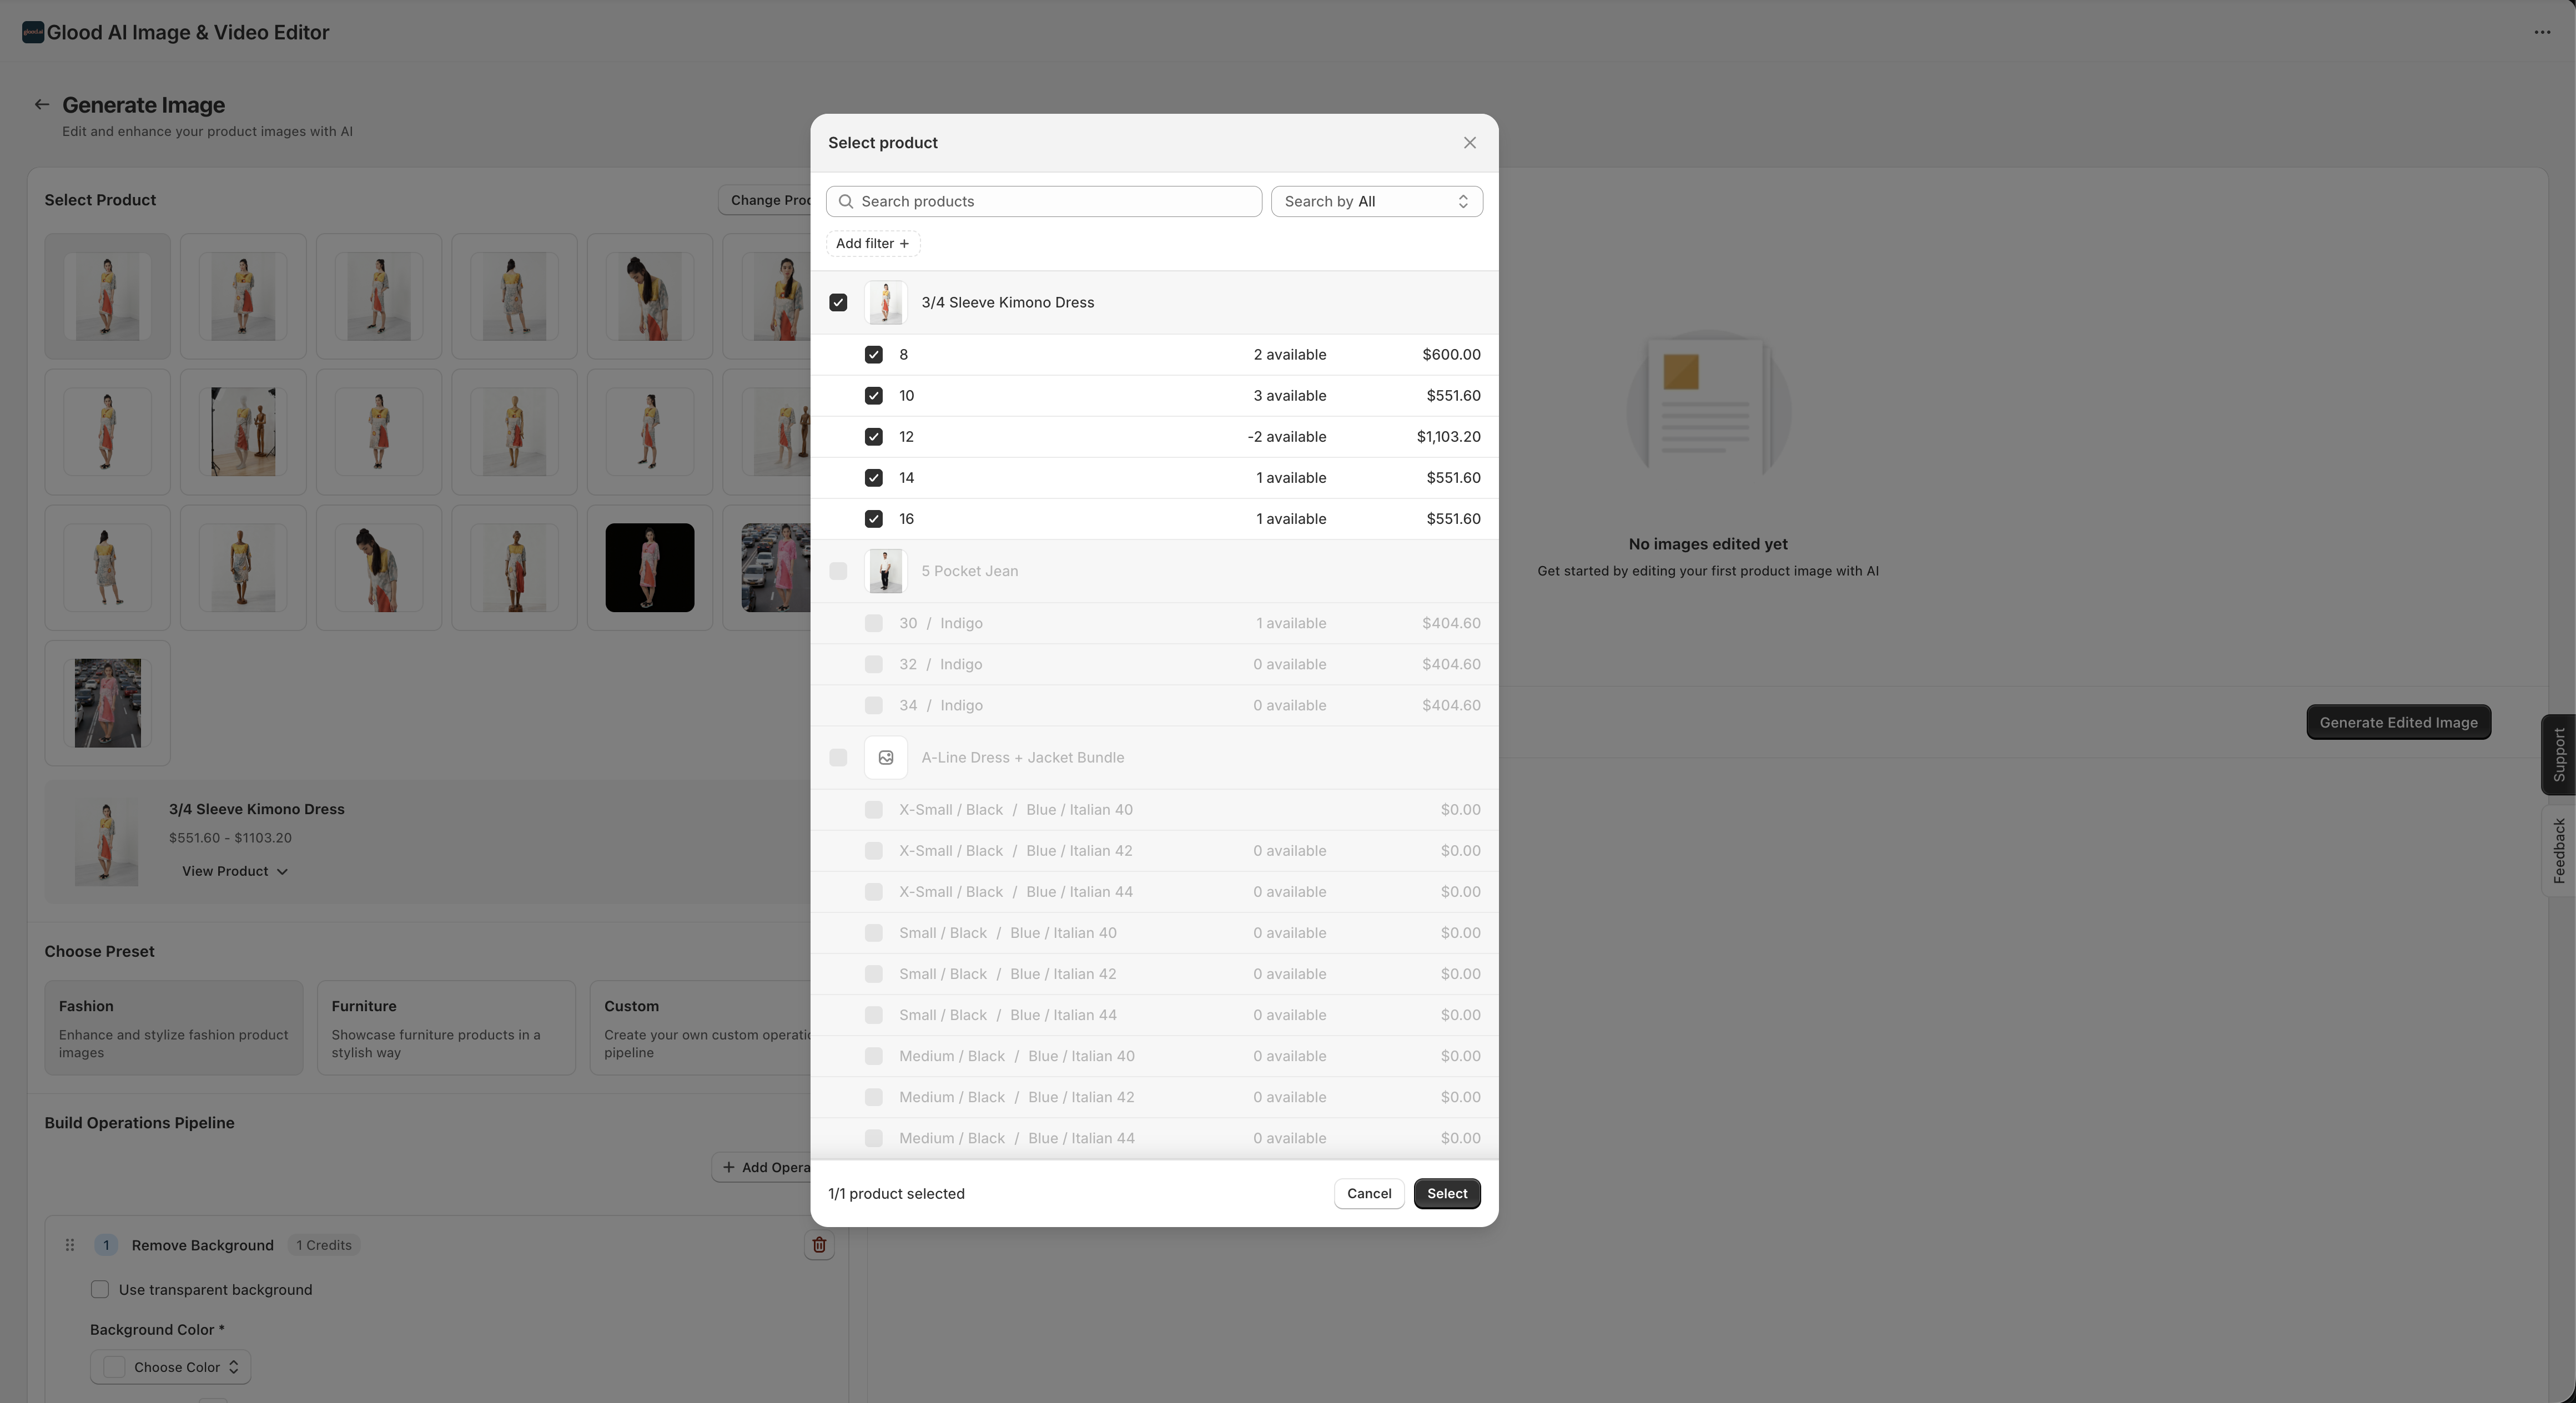 You can:
* Search for specific products
* Select single or multiple products
* Choose specific product images or variants
* Filter by collection or product type
* Preview images before editing
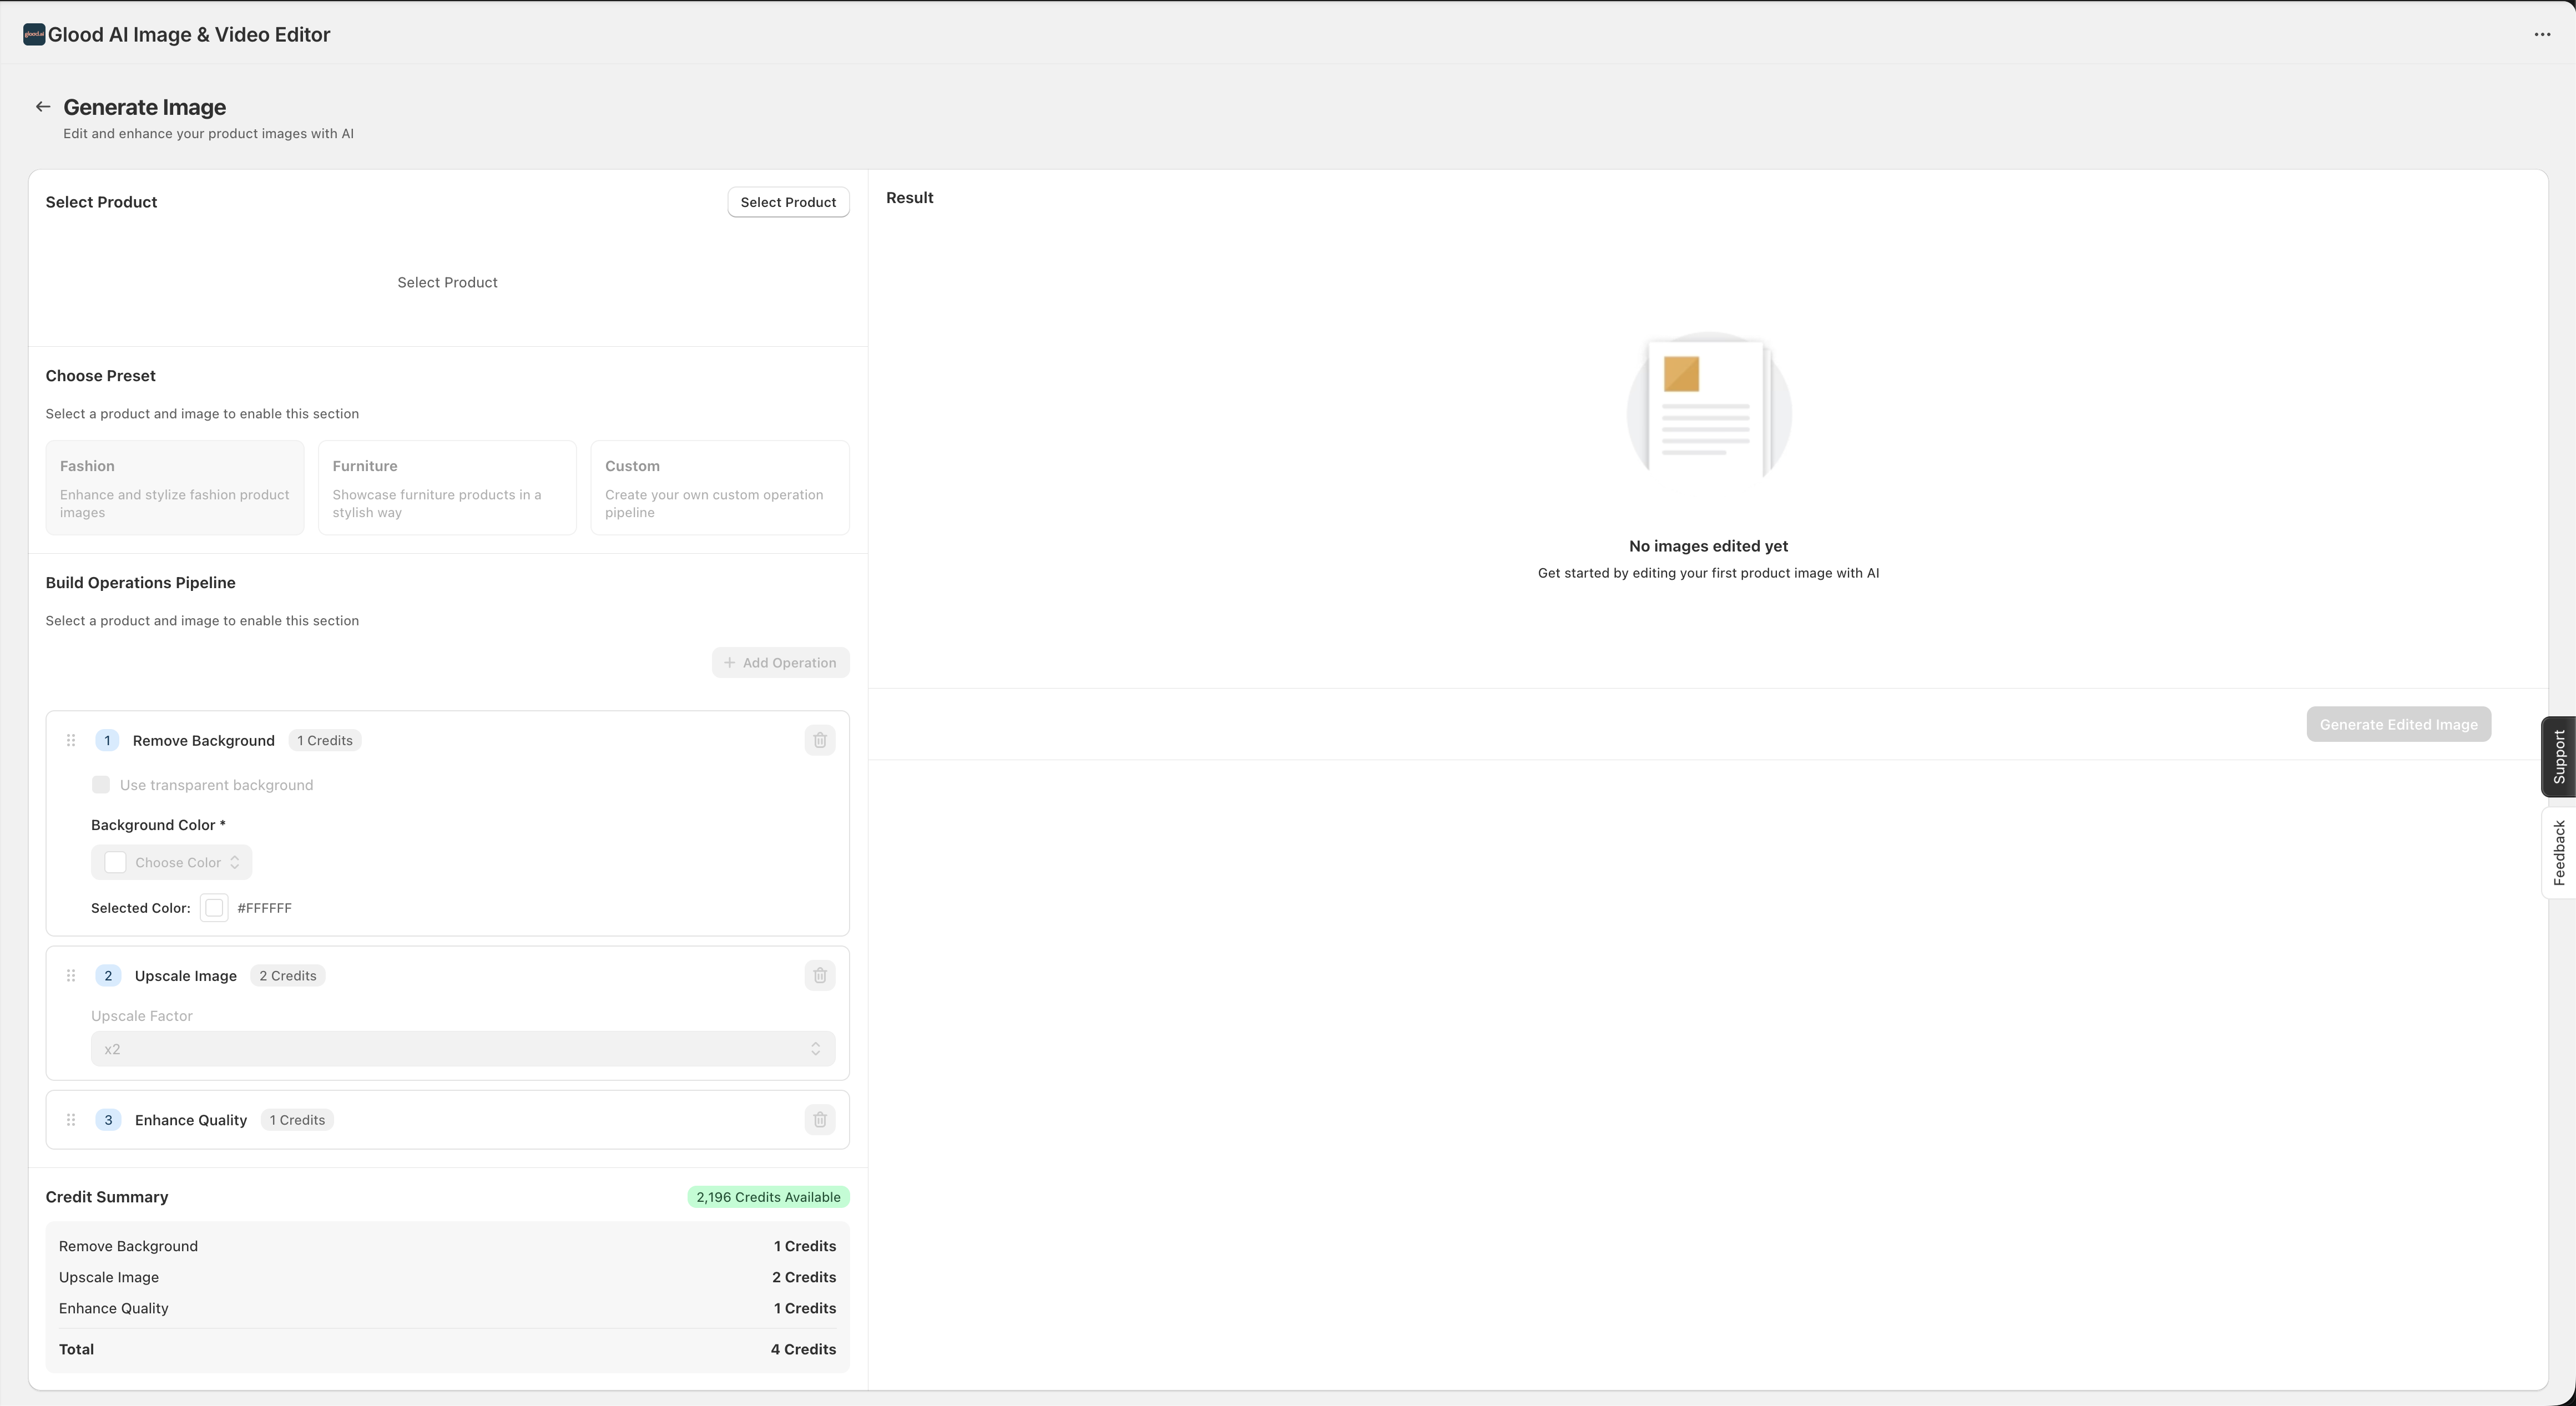
Select from available editing presets and configure your operations:
You can:
* Search for specific products
* Select single or multiple products
* Choose specific product images or variants
* Filter by collection or product type
* Preview images before editing
Select from available editing presets and configure your operations:
 **Fashion/Furniture Presets**:
* Background generation with contextual scenes
* Background removal for clean product shots
* Smart cropping and composition
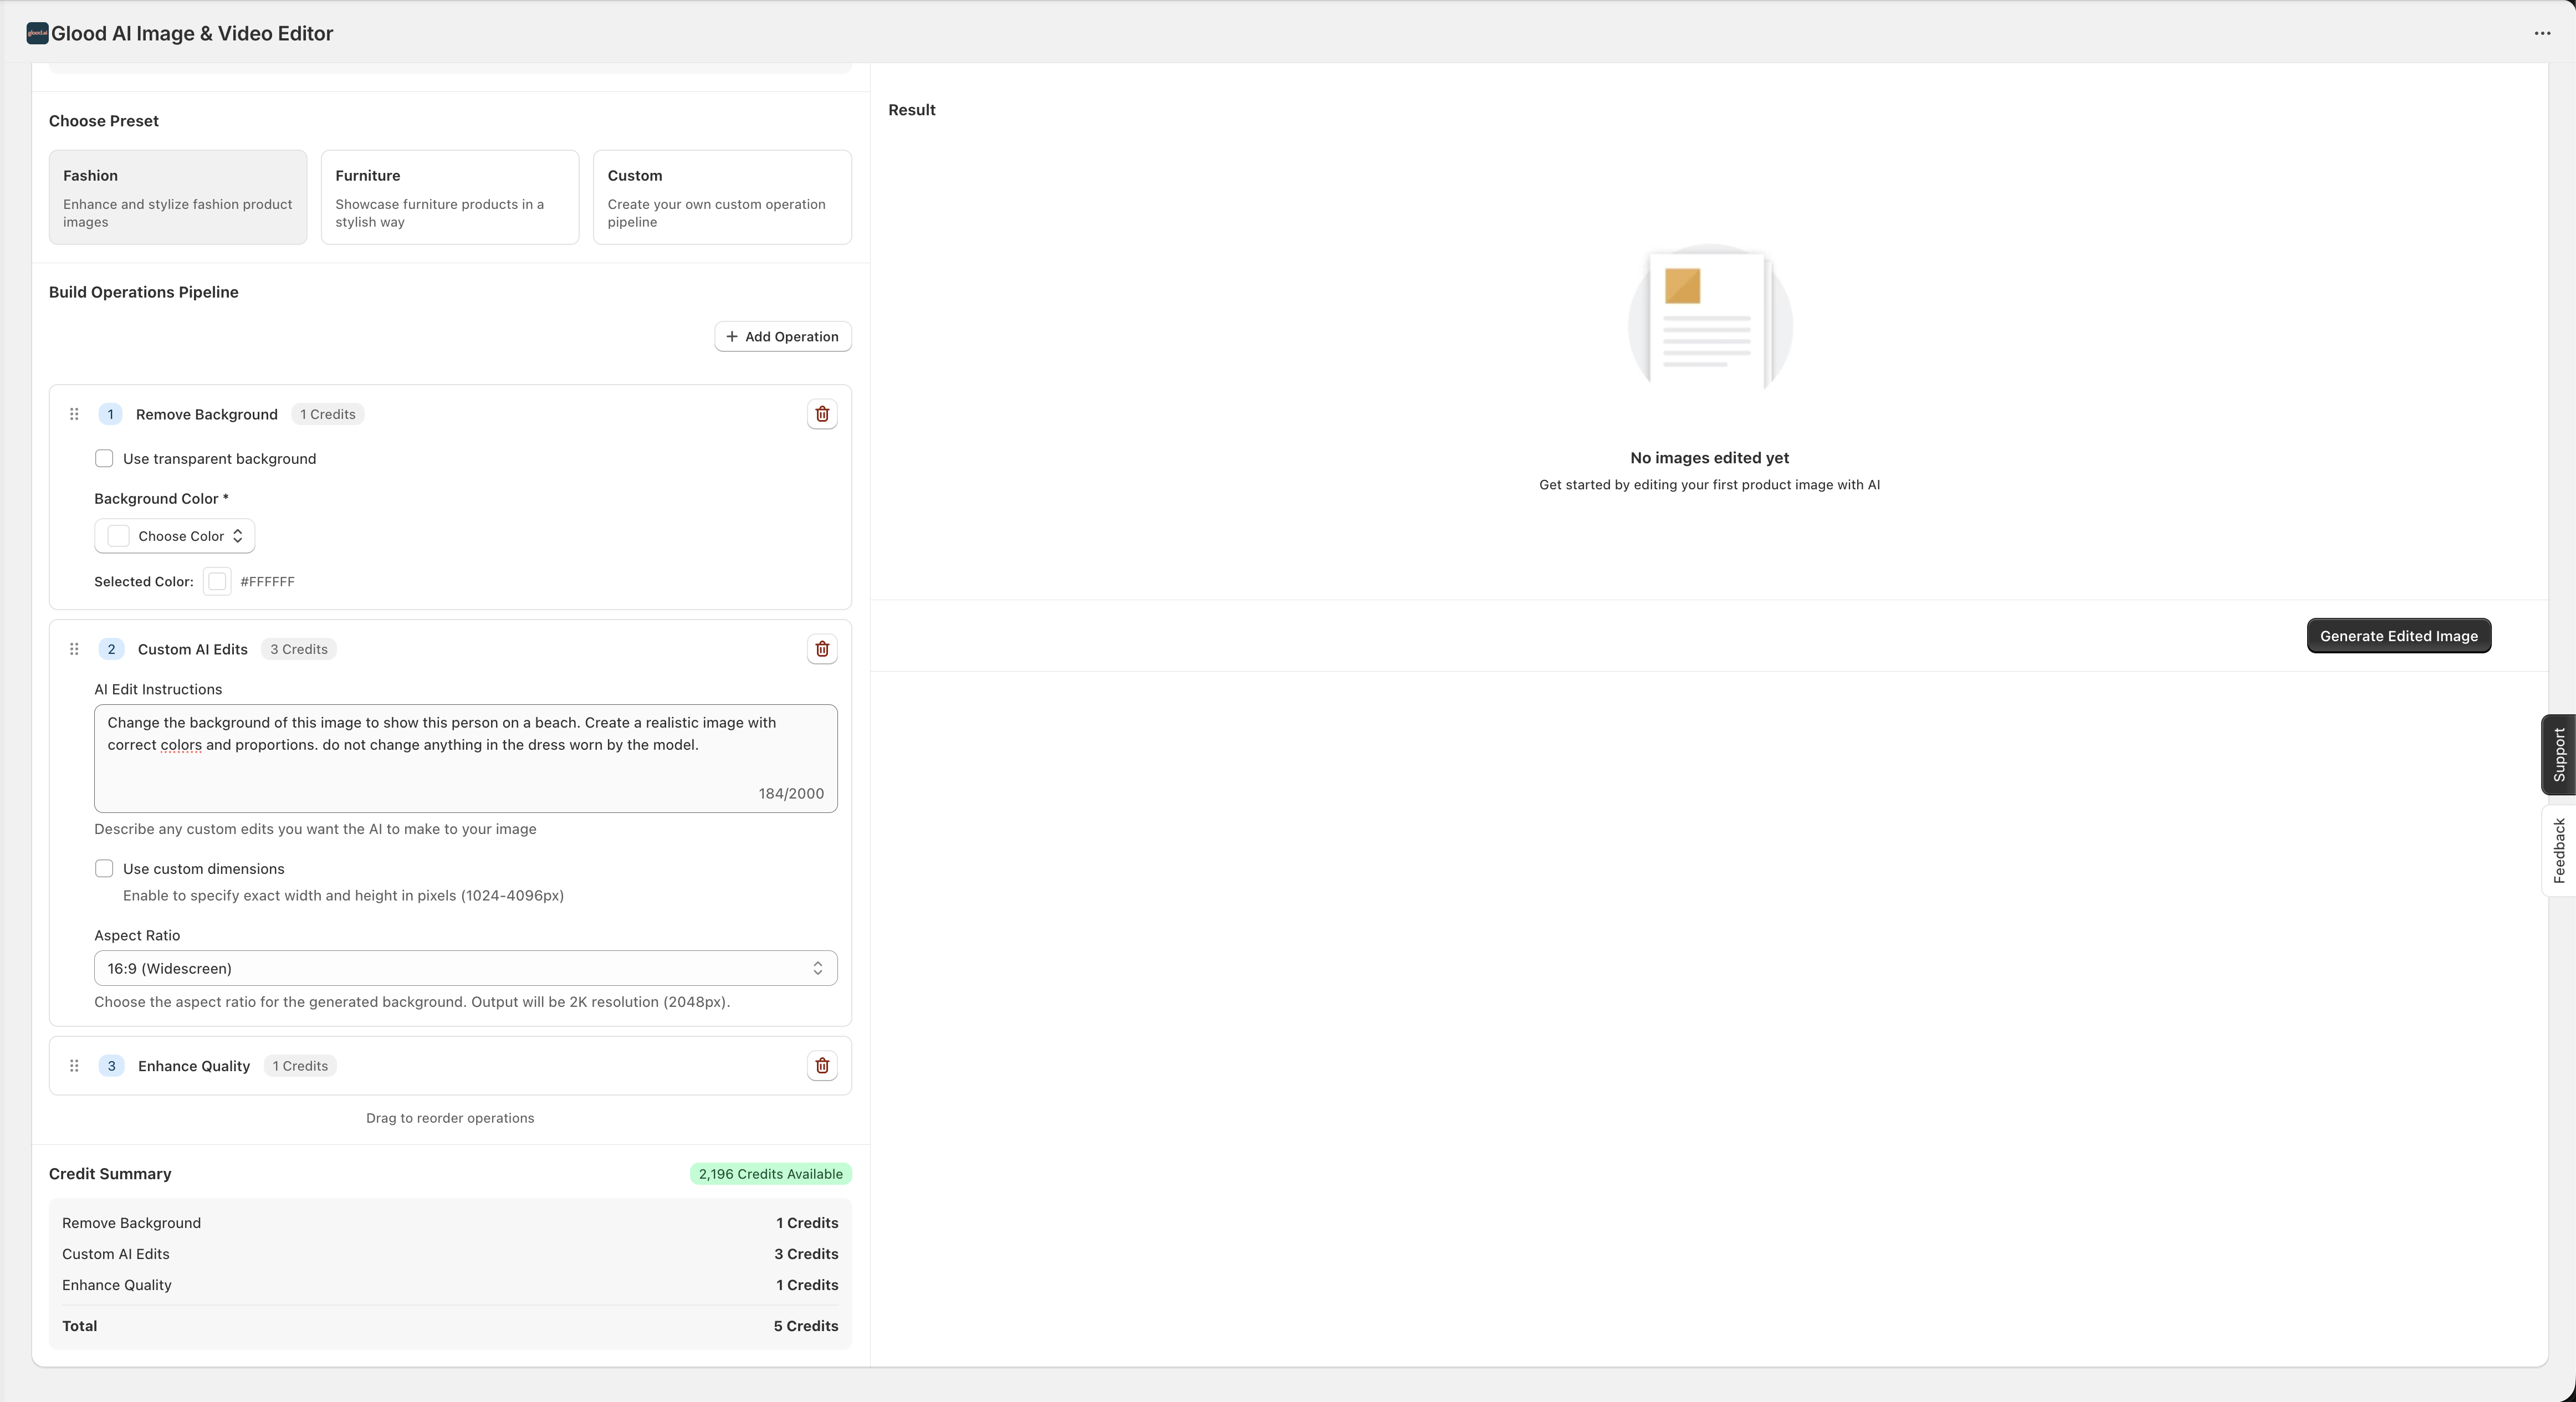
**Custom Editing Options**:
* **Background Generation**: Create custom backgrounds that complement your products
* **Background Removal**: Automatically remove backgrounds with precision
* **Resizing & Cropping**: Intelligent resizing that maintains product focus
* **Enhancement**: Apply AI filters and quality improvements
* **Format Optimization**: Convert and optimize for web performance
Chain multiple editing operations together:
1. Add operations in sequence (e.g., Remove Background → Generate New Background → Resize)
2. Configure parameters for each operation
3. Preview the editing pipeline
4. Review estimated credit cost before processing
The system will show you the exact credit cost based on the number of images and operations selected.
Execute the editing pipeline and monitor progress:
**Fashion/Furniture Presets**:
* Background generation with contextual scenes
* Background removal for clean product shots
* Smart cropping and composition
**Custom Editing Options**:
* **Background Generation**: Create custom backgrounds that complement your products
* **Background Removal**: Automatically remove backgrounds with precision
* **Resizing & Cropping**: Intelligent resizing that maintains product focus
* **Enhancement**: Apply AI filters and quality improvements
* **Format Optimization**: Convert and optimize for web performance
Chain multiple editing operations together:
1. Add operations in sequence (e.g., Remove Background → Generate New Background → Resize)
2. Configure parameters for each operation
3. Preview the editing pipeline
4. Review estimated credit cost before processing
The system will show you the exact credit cost based on the number of images and operations selected.
Execute the editing pipeline and monitor progress:
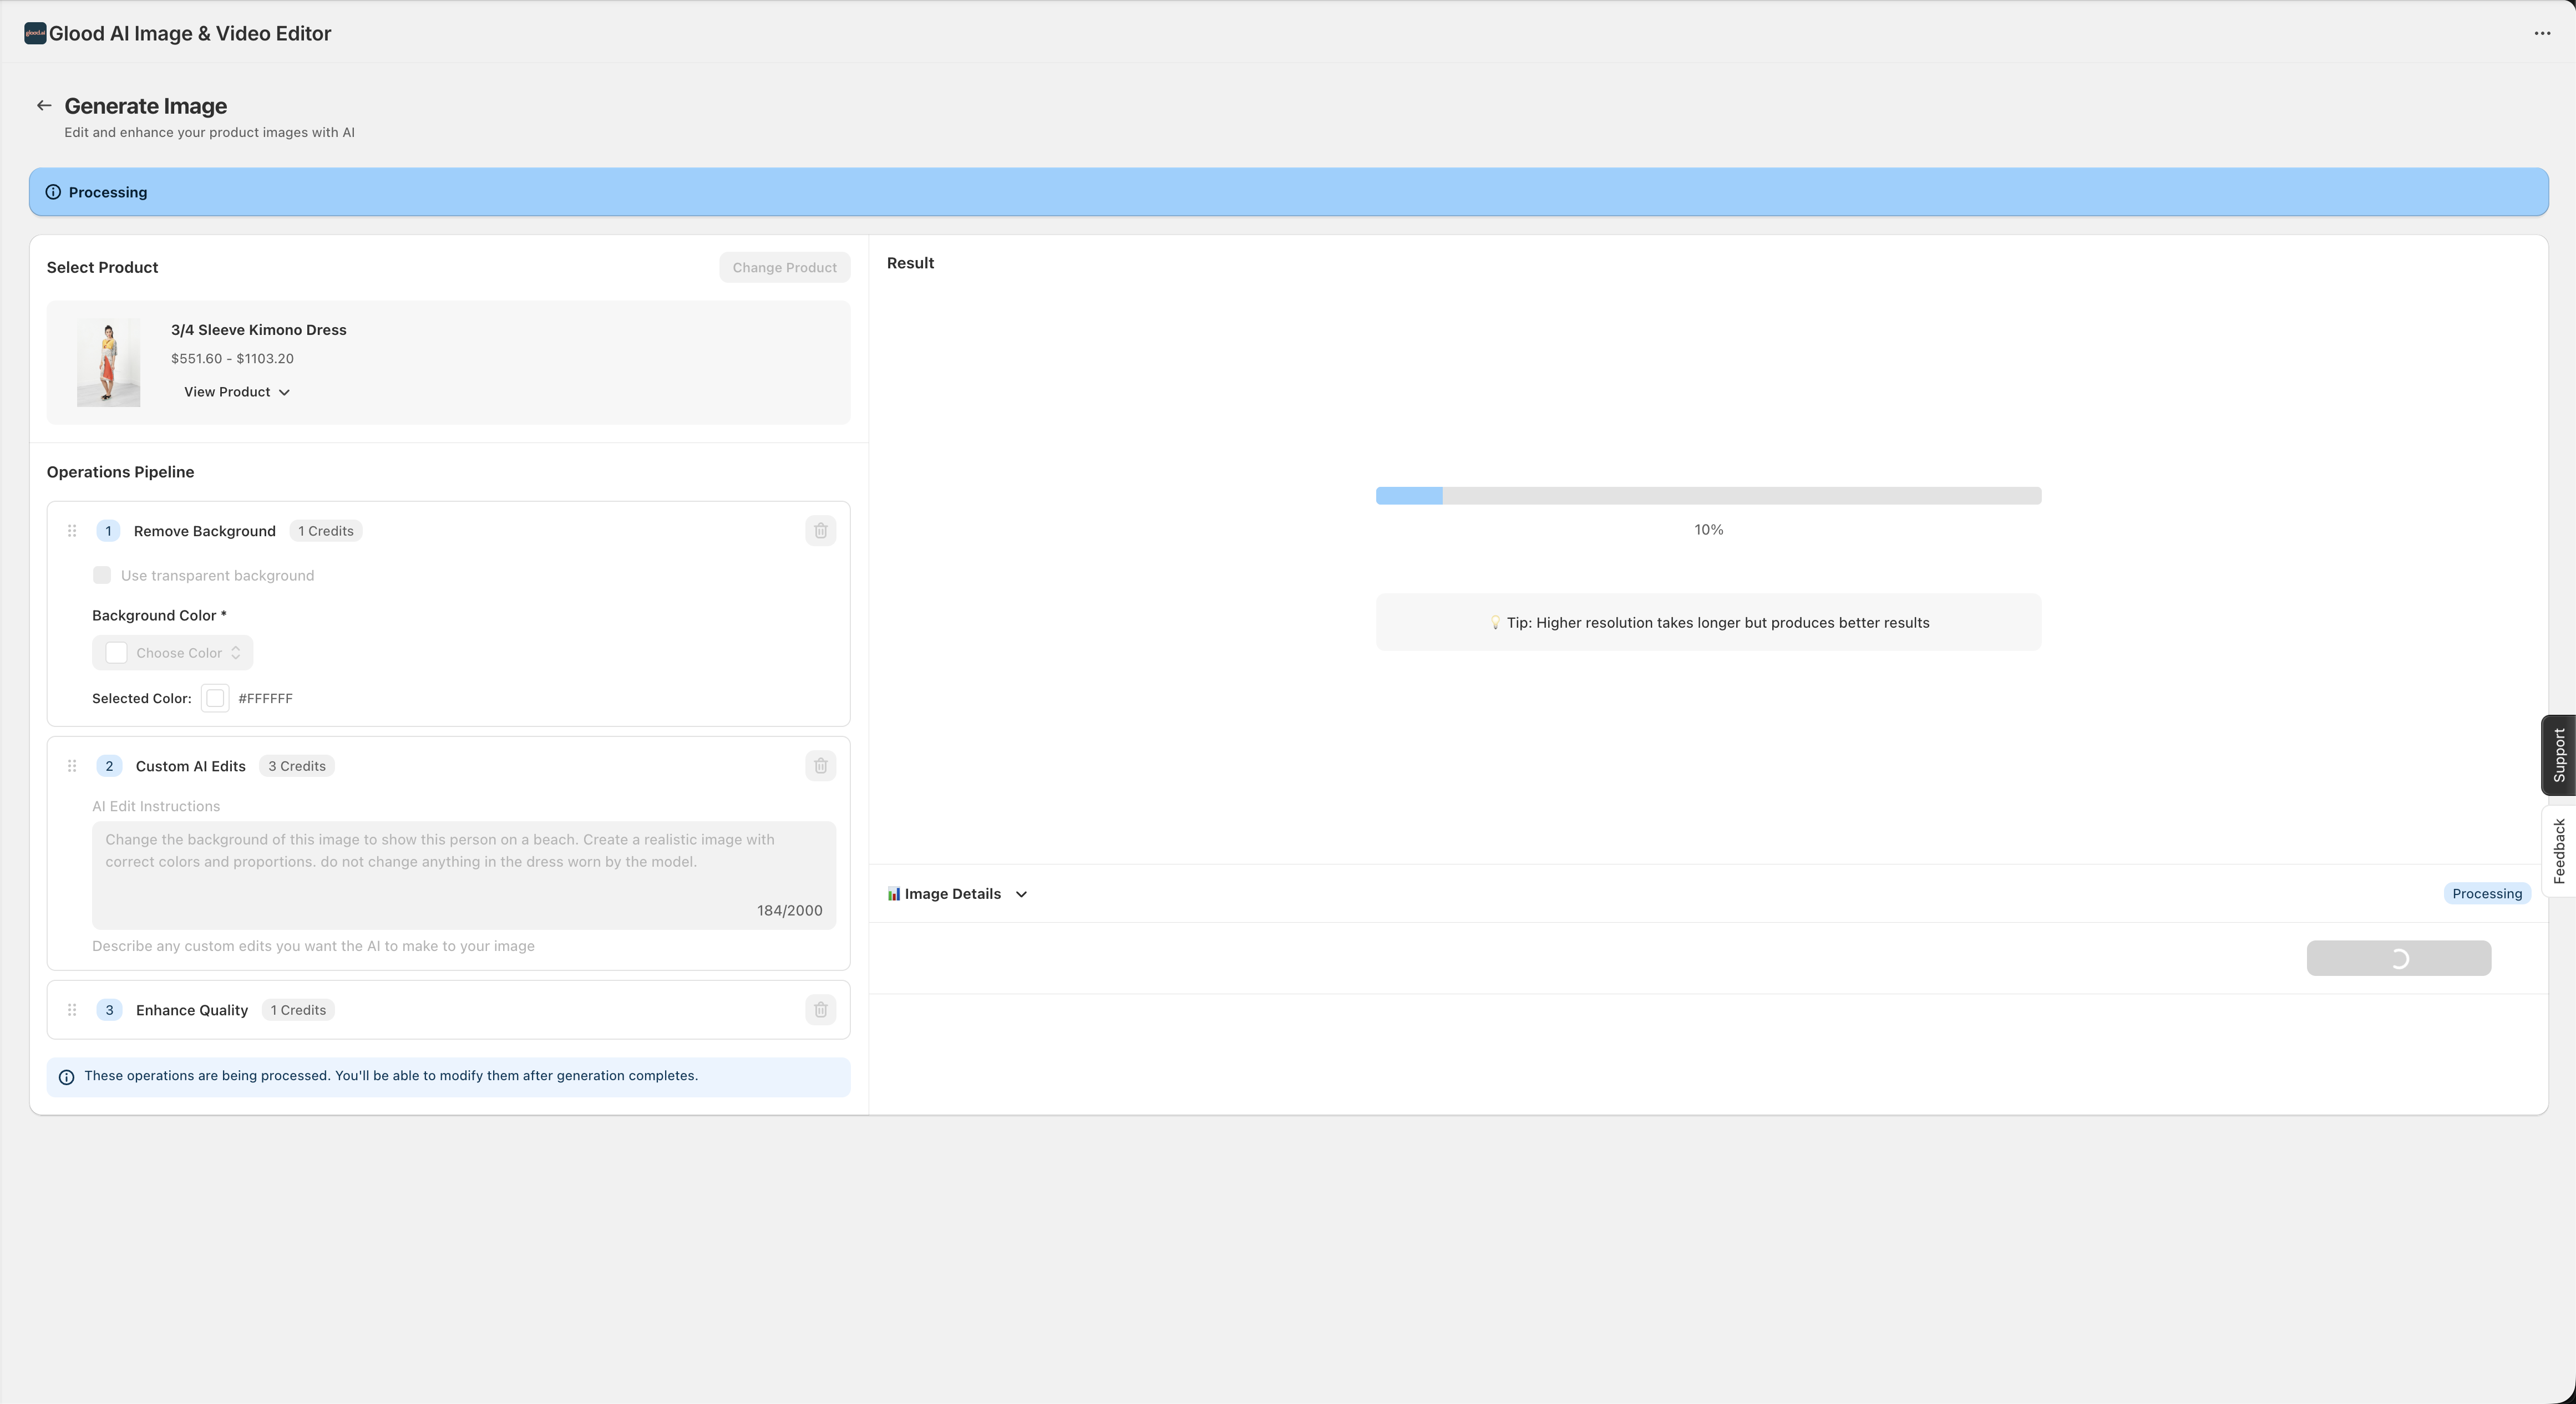 * Process begins immediately after confirmation
* View real-time progress for each operation
* Monitor processing status for batch operations
* Track completion percentage for each image
Once processing is complete, review your edited images:
* Process begins immediately after confirmation
* View real-time progress for each operation
* Monitor processing status for batch operations
* Track completion percentage for each image
Once processing is complete, review your edited images:
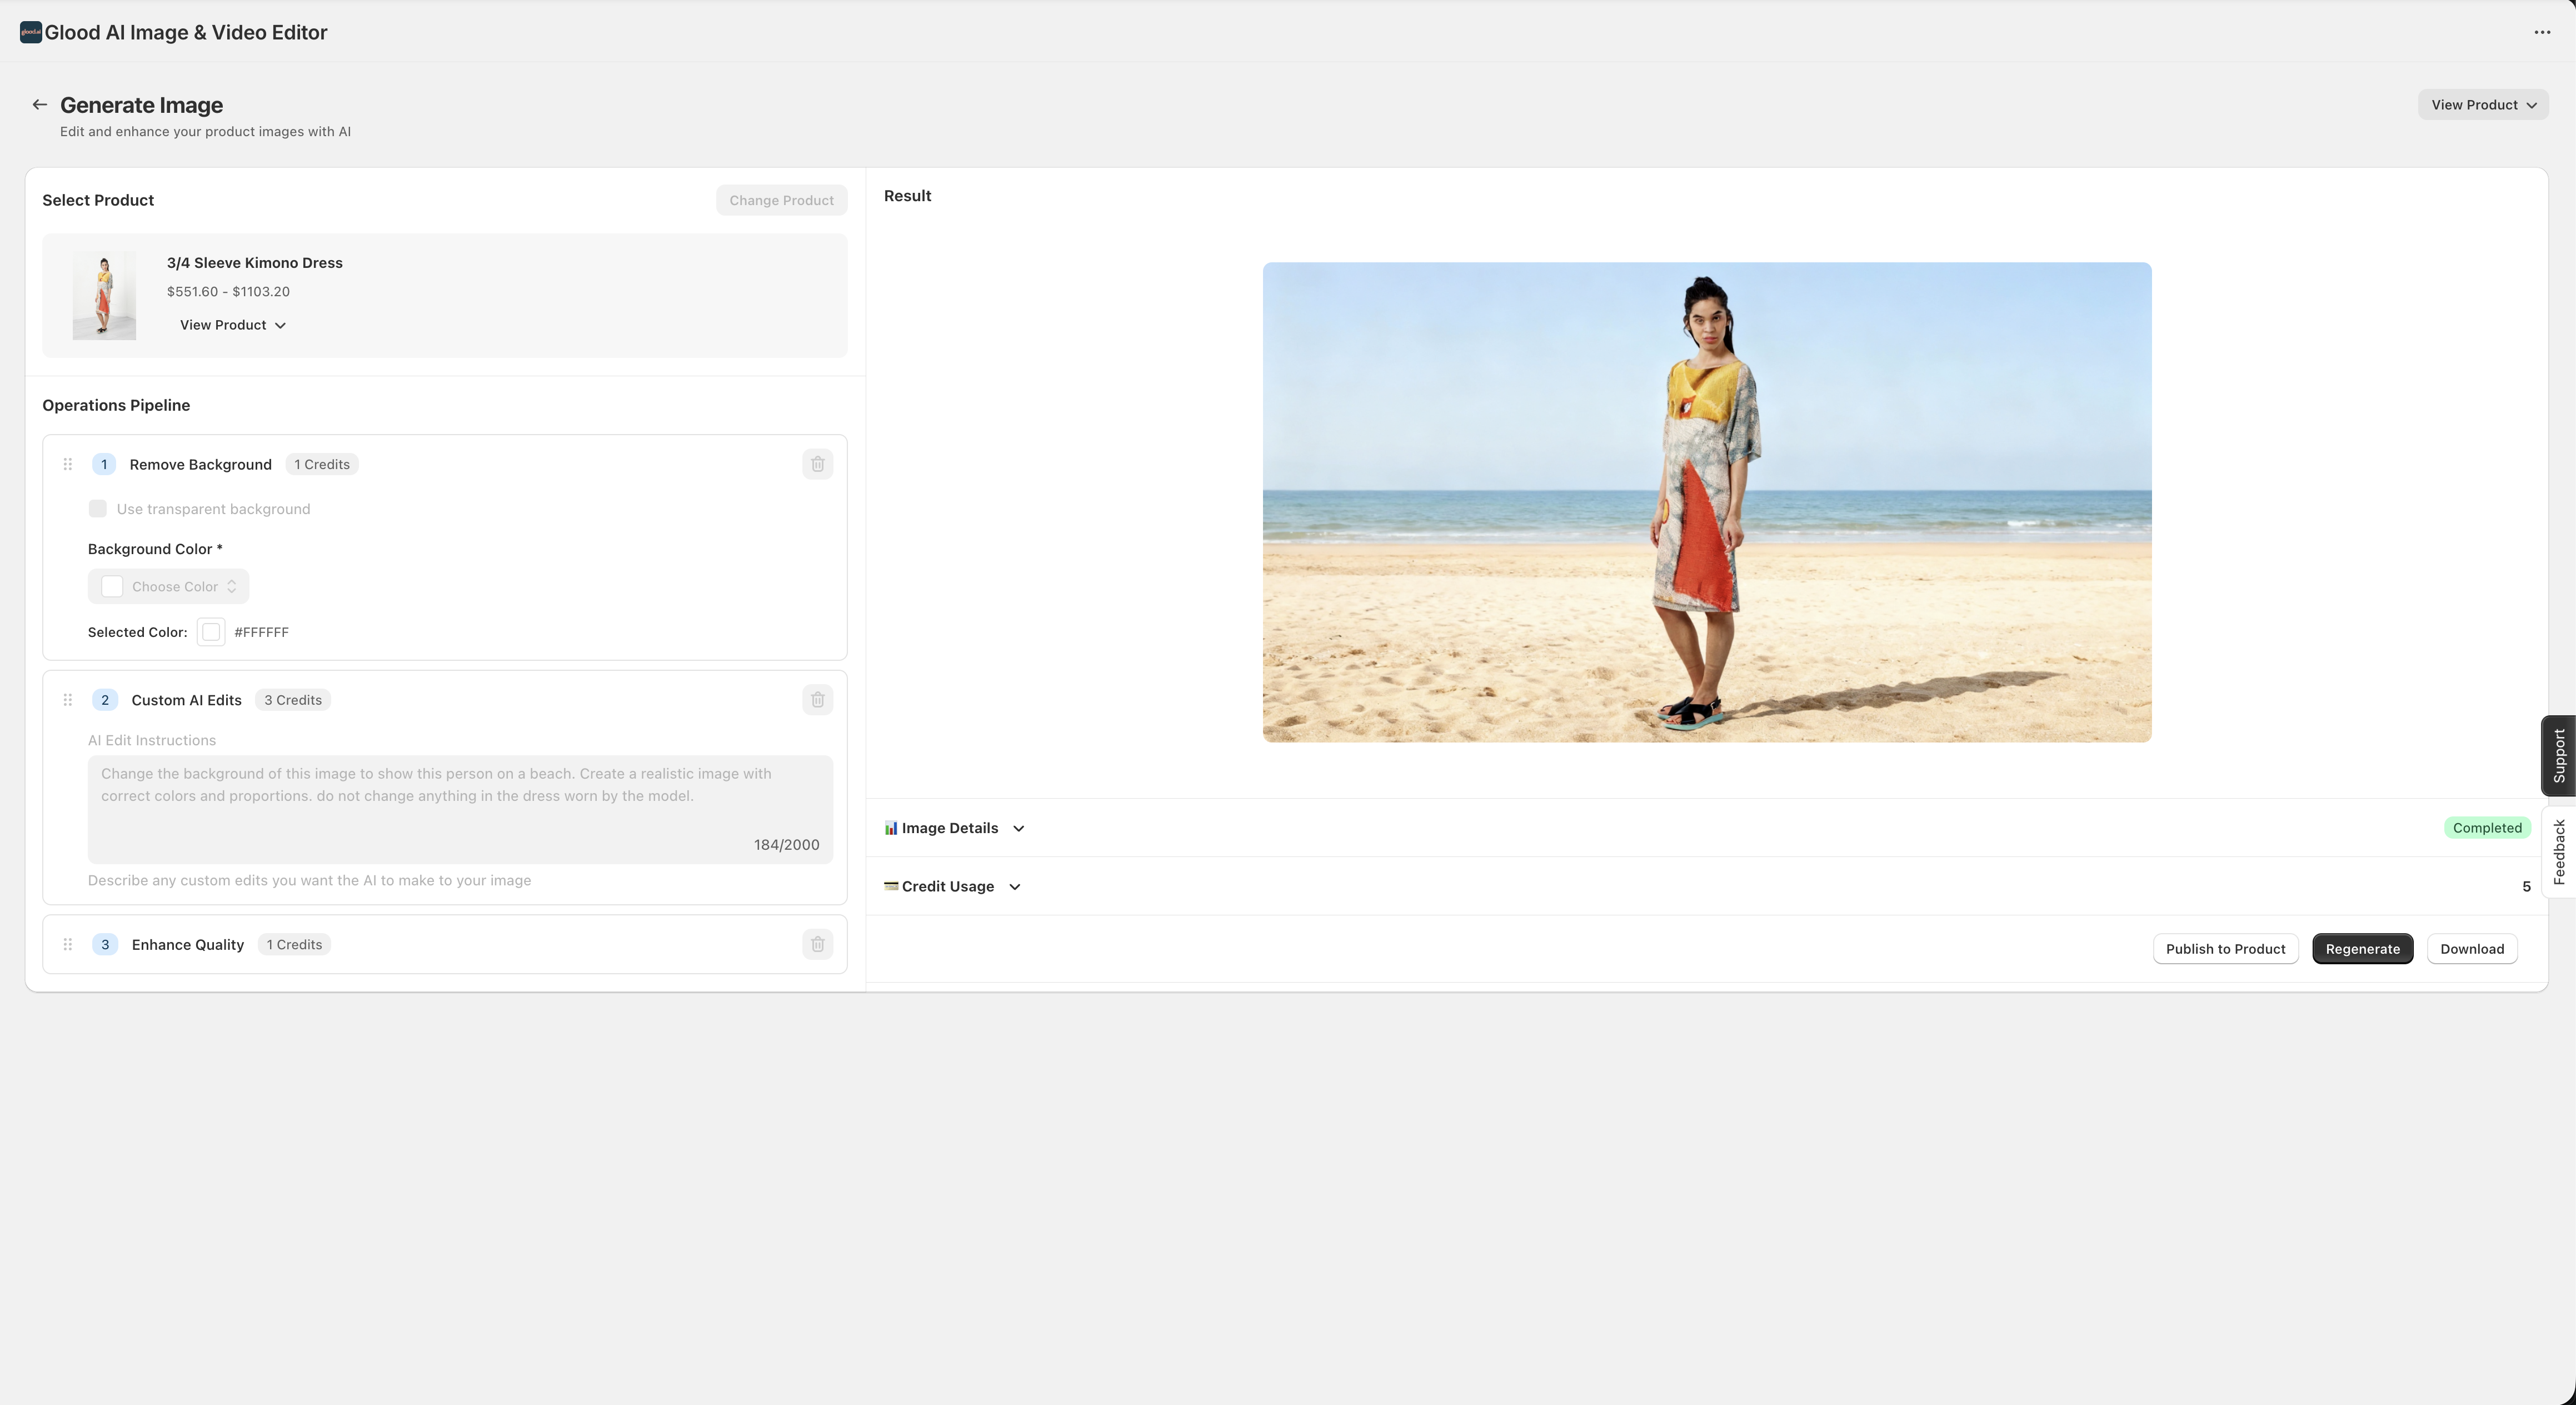 **Review and Actions**:
* Preview all edited images side-by-side with originals
* Check processing status and credit usage
* Download edited images individually or in bulk
* Publish directly to Shopify product media
* Regenerate with different settings if needed
* View detailed operation logs and results
**Batch Processing Tip**: Select multiple products and apply the same editing operations to all of them at once. Perfect for maintaining consistent visual standards across your catalogue.
### Automate Visual Creation at Scale
Create reusable workflows to process multiple products automatically.
From the dashboard, click **"Build Workflow"** or go to the Workflows section.
Click **"Create Workflow"** and provide:
* **Workflow Name**: Descriptive name for your automation
* **Description**: What this workflow does
* **Trigger Type**: On-demand or scheduled
Add and configure steps in your workflow:
**Step Types**:
* Video Generation (with specific settings)
* Image Editing (with operation chains)
* Publishing actions
* Conditional logic
**Configuration**:
* Set parameters for each step
* Define product filters (collections, tags, etc.)
* Configure output destinations
* Set quality and format preferences
Choose how and when your workflow runs:
**On-Demand**: Manually trigger when needed
* Run for specific products
* Execute immediately
**Scheduled**: Automatic execution
* Set recurring schedule (daily, weekly, monthly)
* Define time and timezone
* Apply to new products automatically
Before full deployment:
1. Test the workflow with a sample product
2. Review credit estimates for full execution
3. Verify output quality
4. Activate the workflow for production use
**Pro Tip**: Use workflows to maintain consistent visual standards across your entire product catalogue. Set up scheduled runs to automatically process new products as they're added.
## Credit-Based Pricing
Glood AI Image & Video Editor uses a flexible credit system that scales with your needs.
### How Credits Work
* **Credits** are consumed when you generate videos or edit images
* Credit cost varies based on:
* Video duration and resolution
* Image editing operations and complexity
* Output quality settings
### Free Credits
Receive **\$20 in free credits** when you install the app. Start creating immediately with no upfront cost!
**Note**: Free credits expire after 30 days, so use them to explore the platform's capabilities.
### Purchasing Credits
Buy credit packs that fit your workflow. Higher value packs include attractive discounts:
Perfect for all usage levels
* Packs start from $20, $50, and up
* Multiple sizes available
* Valid for 1 year from purchase
Best value for scale operations
* Higher value packs offer significant savings
* Better value per credit
* Ideal for extensive catalogues
**Credit Policy**: Purchased credits are valid for 1 year from purchase date. All credits are non-refundable. However, if generation fails due to system errors, credits are automatically refunded to your account.
### Managing Your Credits
Monitor and purchase credits from the dashboard:
1. **View Balance**: Check your current credit balance on the main dashboard
2. **Purchase More**: Click **"+ Purchase Credits"** anytime
3. **Track Usage**: Review credit consumption in the **"Credit Usage"** section
4. **Estimate Costs**: See credit estimates before generating content
**Credit Estimates**: Before generating any video or image, you'll see the exact credit cost. This helps you manage your budget and make informed decisions.
## Activity Dashboard
Track your creative output with detailed activity metrics:
* **Videos Created**: Total number of videos generated
* **Total Duration**: Combined length of all videos created
* **Images Edited**: Count of processed images
* **Images Published**: Images published to products
* **Workflows**: Active and total workflow count
* **Workflow Runs**: Number of automated executions
## Next Steps
Now that you're set up, explore these resources:
See real examples of generated videos and edited images
Learn tips for creating high-quality visual content
Get answers to common questions
Integrate video and image generation into your workflow
## Need Help?
* **FAQ**: Check our [Frequently Asked Questions](/ai-image-video-editor/faq)
* **Changelog**: View [latest updates and releases](/ai-image-video-editor/changelog)
* **Support**: Contact our team for assistance
**Review and Actions**:
* Preview all edited images side-by-side with originals
* Check processing status and credit usage
* Download edited images individually or in bulk
* Publish directly to Shopify product media
* Regenerate with different settings if needed
* View detailed operation logs and results
**Batch Processing Tip**: Select multiple products and apply the same editing operations to all of them at once. Perfect for maintaining consistent visual standards across your catalogue.
### Automate Visual Creation at Scale
Create reusable workflows to process multiple products automatically.
From the dashboard, click **"Build Workflow"** or go to the Workflows section.
Click **"Create Workflow"** and provide:
* **Workflow Name**: Descriptive name for your automation
* **Description**: What this workflow does
* **Trigger Type**: On-demand or scheduled
Add and configure steps in your workflow:
**Step Types**:
* Video Generation (with specific settings)
* Image Editing (with operation chains)
* Publishing actions
* Conditional logic
**Configuration**:
* Set parameters for each step
* Define product filters (collections, tags, etc.)
* Configure output destinations
* Set quality and format preferences
Choose how and when your workflow runs:
**On-Demand**: Manually trigger when needed
* Run for specific products
* Execute immediately
**Scheduled**: Automatic execution
* Set recurring schedule (daily, weekly, monthly)
* Define time and timezone
* Apply to new products automatically
Before full deployment:
1. Test the workflow with a sample product
2. Review credit estimates for full execution
3. Verify output quality
4. Activate the workflow for production use
**Pro Tip**: Use workflows to maintain consistent visual standards across your entire product catalogue. Set up scheduled runs to automatically process new products as they're added.
## Credit-Based Pricing
Glood AI Image & Video Editor uses a flexible credit system that scales with your needs.
### How Credits Work
* **Credits** are consumed when you generate videos or edit images
* Credit cost varies based on:
* Video duration and resolution
* Image editing operations and complexity
* Output quality settings
### Free Credits
Receive **\$20 in free credits** when you install the app. Start creating immediately with no upfront cost!
**Note**: Free credits expire after 30 days, so use them to explore the platform's capabilities.
### Purchasing Credits
Buy credit packs that fit your workflow. Higher value packs include attractive discounts:
Perfect for all usage levels
* Packs start from $20, $50, and up
* Multiple sizes available
* Valid for 1 year from purchase
Best value for scale operations
* Higher value packs offer significant savings
* Better value per credit
* Ideal for extensive catalogues
**Credit Policy**: Purchased credits are valid for 1 year from purchase date. All credits are non-refundable. However, if generation fails due to system errors, credits are automatically refunded to your account.
### Managing Your Credits
Monitor and purchase credits from the dashboard:
1. **View Balance**: Check your current credit balance on the main dashboard
2. **Purchase More**: Click **"+ Purchase Credits"** anytime
3. **Track Usage**: Review credit consumption in the **"Credit Usage"** section
4. **Estimate Costs**: See credit estimates before generating content
**Credit Estimates**: Before generating any video or image, you'll see the exact credit cost. This helps you manage your budget and make informed decisions.
## Activity Dashboard
Track your creative output with detailed activity metrics:
* **Videos Created**: Total number of videos generated
* **Total Duration**: Combined length of all videos created
* **Images Edited**: Count of processed images
* **Images Published**: Images published to products
* **Workflows**: Active and total workflow count
* **Workflow Runs**: Number of automated executions
## Next Steps
Now that you're set up, explore these resources:
See real examples of generated videos and edited images
Learn tips for creating high-quality visual content
Get answers to common questions
Integrate video and image generation into your workflow
## Need Help?
* **FAQ**: Check our [Frequently Asked Questions](/ai-image-video-editor/faq)
* **Changelog**: View [latest updates and releases](/ai-image-video-editor/changelog)
* **Support**: Contact our team for assistance